Thursday, June 27, 2013

Twilight Chess Pieces - Great for throwing a Twilight Party


This is my first ever craft project that I used wash tape on. I have been dying to make these and so I set some time aside yesterday and tackled this project. These are the perfect table or food area display for a twilight party. If you are a twilight fan you know that chess pieces, apples, ribbons and striped tulips are the go to designs for twilight anything. Namely because these are the items pictured on the front of the 4 book series. Also the color theme usually is black, red and white. 

Supplies needed for this project:
  • wood chess pieces (I purchased mine from oh my crafts)
  • washi tape
  • paint
  • paint brush
  • masking tape
  • exacto knife or scissors (much easier with exacto knife)


I started off by painted the edges black. (see pictures below)
Because I was sloppy I also got black on the front and back of the piece and ended up having to also paint the front and back black. If you are careful during this step you can eliminate the masking tape all together.


This photo shows you why I had to use masking tape. Because the block is black the wash tape isn't as clear and crisp like it should be. the below photo shows how the top part of the piece does not have masking tape underneath and the bottom part does.


With this particular chevron washi tape there are 2 different looks you can get from this just by the way you place the next piece. the top part shows what it would look like if you continued the chevron pattern all the way up. the bottom shows how by moving the design over a little you will end up with a row of diamonds in between the chevron rows. I choose the diamond look.


This next photo shows the steps I took to cover the front and back of the pieces . 
Step 1: (Top Right) Cover entire piece with rows of masking tape.
Step 2: (Left) Apply rows of washi tape making sure you match up the dots, stripes, etc. 
Step 3: (Bottom Right) using your exacto knife, hold the overlapping tape with your left hand                     and slowly a sharp blade and a up and down motion, cut around the edges of the piece.


When I applied the striped washi tape. I decided to do it from top to bottom instead of side to side.
I started applying the tape to the middle first and the moved outward. When laying down the stripes I overlapped the last red stripe onto the first red stripe of the previous row.


These turned out so good, you can always add ribbon around the middle, darken the edges,  or even bling it up more.

Happy Twilight Party!!!

Carrie

Linky Parties


Lil Luna                          Someday Crafts                     the 36th Avenue C.R.A.F.T Craft-O-Matic Skip to my Lou Sumos Sweet Stuff The Dedicated House

Wednesday, June 26, 2013

The Zipadee-Zip Giveaway!!!

Is your little one a swaddle addict? The Zipadee-Zip is the solution to the swaddle transition! Jen from Pin-n-Tell used the Zipadee-Zip for her own swaddle happy little boy and had great results. Check out her full review here Why do we love the Zipadee-Zip?
  • Great for swaddle transitioning
  • Cozy & secure, but still gives full range of motion for babies who roll over (my little guy likes to roll and sleep on his tummy sometimes)
  • Baby's hands are covered and prevented from scratching their face
  • Helps baby to self soothe
  • Lightweight and breathable material
  • A cinch to use... just zip up!

Get Connected with Zipadee-Zip

Website: http://zipadeezip.com/ Facebook: http://www.facebook.com/pages/Zipadeezip-Slumber-Sacks-wwwzipadeezipcom/140978145992706 Twitter: https://twitter.com/Zipadeezip   Do you want to win a Zipadee-Zip? Of course you do! Zipadee-Zip is giving one Pin-n-Tell reader a chance to win! Just enter below. If you just can't wait and your little one needs a Zipadee-Zip now, I have great news for you. Zipadee-Zip is giving Pin-n-Tell readers get a special $2.00 off discount code. Just use the code SLEEP when you place your order at http://zipadeezip.com/

 Click here  Entry-Form to enter.


Good Luck Everyone!!

Carrie

Tuesday, June 25, 2013

Mom's Pure Wisdom and Wonderful Water

Mom's are just full of wonderful helpful wisdom. Growing up I always had a closer relationship with my mom and it has continued into adulthood. Mom was the one I would call when my heart was broken, when I was hurt, when I landed a terrific job, when I got engaged. I wanted to share all of these experiences with her.

one thing she has always advised me about was to drink more water.
and how perfect that today I wanted to talk more about water.

I recently went to a blogger get together at the Spa Atlantis where they treated us with mini massage and also taught us many things about our skin and health.
After talking to the acupucturist she told me that my body was completely depleted of water.
Oh boy was she right on the money. I am horrible about drinking enough liquid in general let alone water. I am lucky if I drink 50 0z of anything a day.

So now I come to the exciting part.

Nestlé® Pure Life® is challenging people to swap one sugary beverage a day with water for a year to cut 50,000 calories from their diet, and then share their family's story of healthy hydration on the Facebook page mosaic. Come check them out and "like" there page.

I have set myself a goal of at least 80oz a day. Wish me luck.

For mothers and future mothers it's important to teach your children while there young to drink water, it will help them keep healthy. they will thank you later.


How refreshing does this water look. 


Happy Hydrating!!!

Carrie

This article is sponsored by Nestlé® Pure Life® Purified Water

Monday, June 24, 2013

Urban Decay NAKED Palette Giveaway

The Urban Decay Naked Palette is a must have this summer because we all want to look good! As another makeup favorite of mine the timing is perfect to give it away. Enjoy, from LeChateaudesFleurs.
This long, lean, seductive case is packed with TWELVE gorgeous neutrals. Shades range from delicate champagnes to dark, gritty gunmetal, with names like Darkhorse, Virgin and Buck. We've also included a range of textures: everything from glitter to shimmer to matte.


RainShadow Labs
RainShadow Labs


RainShadow Labs provides the highest quality wholesale cosmetics. They offer lotions, washes, cremes, candles, soaps, gels, essential oils and so much more. 


Visit them here: 

AEWR Turbo Wrinkle Smoothing Treatment
One of my favorite products fro RainShadow Labs: 

AEWR Turbo Wrinkle Smoothing Treatment
The name says it all. If there is one turn back the clock product that every person over 25 with skin should have, this is it.  Restore firmness, heal sun damage, increase hydration, erase wrinkles, smooth texture, nourish at the dermal layer, minimize irritation, increase skin brightness and even out skin tone.

Enter to win the Urban Decay Naked Palette:
Open worldwide. Ends 7/8/13. Entries will be verified. See Rafflecopter for full Terms.

a Rafflecopter giveaway

Saturday, June 22, 2013

Faux Leather Flower Hairclip Tutorial


The tutorial for today is a fantastic faux leather flower hair clip.

Supplies I used:
faux leather
Tim Holtz - Copper Mixatives alcohol ink
Mister Huey's - Dark Calico color mist
Beads in multi colors/shades
Sponge Brush
glue gun & glue
needle & thread
snap on & snap on clip


Start by drawing a single pedal (i roughed mine)
then I grabbed a piece of white faux leather that I recycled from the cover of an old address book.
trace 5 petals (with pencil) on the back (smooth side) and then cut them out.


To make a petal, pinch in the middle and then sides of the bottom of the petal. it will look like an accordion. Take thread and needle and stitch through the bottom a couple times and tie off.
Arrange the petals in the arrangement that looks best for you.
Now grab that needle and thread again and run through the bottom of each one until you have all of the petals attached on one string (top R. photo). pull the string tight and tie off. Too secure the petals from not moving. apply a dab of hot glue on the tip of the middle section, let dry. turn over and put another dab of glue to the middle of the back, let dry. Now it is ready to color and bling.


working on one petal at a time, I applied 2 drops of the copper alcohol ink and then using a sponge brush, spread all over the petal. It is ok if you can still see the white coming through. Finish all 5 petals, then move to the next step. Now spray a little of the color mist on a piece of plastic or paint palette. dip same sponge brush into the mixture and brush lightly around the edges of the petals adding a bit more darkness and depth.  Paint job done and now to finish the flower I grabbed 3 different shades and sizes of pearl beads and with the hot glue gun again i added beads until i was happy with the end result.


Flower finished. I decided to attach my flower to a snap on clip so that the flower could be used for more than a hairclip. I have snap on claws that it can snap on to also. this way I can attach it to an outfit or a bag. the possibilities are endless. 

Happy Creating!!

Carrie

Linky Parties


Six Sister's Stuff                            Tatertots and Jello                  Nifty Thrifty Things
Home Stories A to Z                     Ladybugs Blessings              Not Just A Housewife
Sugarbees Craft                          Todays Creative Blog

Wednesday, June 19, 2013

Matterhorn Bobsled Disney Facts & Tips

I have had a long time affair with one of my favorite loves... Disney.
How do you not love Disney.  So I have decided to highlight a ride, 
attraction from Disneyland or Disneyworld each week.

Today I am going to start this series with the Matterhorn Bobsled Ride @ Disneyland California

the Matterhorn bobsleds attraction is one of the oldest rides in Disneyland. 
Opened June 14, 1959
The mountain is actually a scale replica of the real Matterhorn in Switzerland. It was originally going to be a rock candy mountain, but the Swiss Alps impressed Walt Disney so much that he wanted to make his own mountain in Disneyland. You can only find the Matterhorn in the Disneyland park making it a one of a kind attraction.


Renovation

 The matterhorn currently went through a 6 month renovation back in the beginning of 2012 that cost $1 million dollars. The mountain was repair rocks repaired, new entrance for single riders only added and new bobsleds.
The last known refurbishment was in 1978

Now, Matterhorn Mountain sparkles! To mimic the snow patterns on Switzerland's original mountain, more than 800 gallons of paint have been used to create "heavier" snowfall on the northern side of Matterhorn Mountain and less snow on the granite-colored southern side. Realistic, yes — but not without a touch of magic. Using a new, environmentally friendly technique, glass beads have been fastened to the façade to reflect sunlight and glisten like actual snow. Also, more pine trees have been planted to add to the atmosphere.
The Matterhorn reopened on June 15, 2012. 
June 16, 2012 the Matterhorn Mountaineer's returned. Mickey Mouse is known
 to ocassionally join the mountaineers to climb the mountain.


Bobsleds

The difference between the original bobsleds and the new bobsleds are:

The Orginal: These bobsleds to seat up to 8 people, 4 people single file per sled (with the second person sitting in front of the first person). Each bobsled had two large compartments. also they used seatbelts which we're not retractable, instead they we're a long strap that buckles into a shorter strap on the opposite side and you would have to pull or loosen the strap to adjust it to fit.

New:  These bobsleds seat 6 people , 3 people to each bobsled (there are 2 bobsleds attached to each other). You have your own compartment and you never have to share. These do not have seat belts, instead they have lap bars.


Tracks

 There are 2 separate tracks on this ride. One is on the Tomorrow land side and one on the Fantasy Land side.

Tomorrow Land side (Left Track) : Is the faster side. It has a larger dip in the beginning of the track, it is run on the inner track so it can be a rougher ride. 
Duration Time: 2:07 minutes            Length: 2,037 feet

Fantasy Land side (Right Track): Is said to be the slower side and is a smoother ride. It is run on the outer track
Duration Time: 2:26 minutes      Length: 2,134 feet


During the ride (either side) you will have 2 opporunity's to see Harold the yeti/abominable snowman, and nice views of the park when you aren't rushing through the ice caves.


This was a cool breakdown of how it was built.


Facts

  • built 1/100th scale of the real matterhorn
  • 147 feet high versus the 14,700 feet of the original
  • max speed 27mph
  • This was the 1st steel roller coaster in the world. It opened along with the Disneyland Monorail and the Submarine Voyage.
  • It was the first roller coaster to employ a tubular steel track and an electronic dispatch system which enabled more than one car at a time to be on the track.
  • The attraction was inspired by the disney film "Third Man on the Mountain". The movie was filmed in Switzerland, on and around the real Matterhorn. Guests who look quickly look while in the caverns may spot mountaineering supplies and other evidence of the Wells Expedition. One of the crates says Frank Wells after an experienced mountaineer and President and Chief Operating Officer of the Walt Disney Company for 10 years ranging from 1984-1994.
  • When creating this attraction they planted larger trees near the base of the mountain. the higher up the mountain the smaller the trees until the disappear all together. 
  • There is an actual Basketball half court in the top 1/3 of the mountain.


Hope this post was informative.

Happy Disney Day!!!

Carrie

Some of the places I found my info are the following.
disneyland.com
maggie blake: yahoo contributor
allears.net
Disney Park Videos

Monday, June 17, 2013

Gen-Y GO Bag Giveaway!!!

I am happy to be able to team up with Gen-Y Diapers and Pin-n-Tell to bring you a giveaway for the Gen-Y GO Bag! Jen @ Pin-n-Tell was able to review this awesome wet/dry bag. You can read here full review here- http://pin-n-tell.com/gen-y-go-bag-giveaway/

Why we love the GO-Bag

  • Made by Gen-Y so it is the highest quality
  • Cute, Cute, Cute patterns
  • 16" x 14" zipper closure waterproof pocket
  • 12" x 14" snap closure dry pocket (lined for durability; pleated with an elasticized top for extra room)
  • A polyester webbing strap with a buckle closure so it can hang out anywhere
  • A snap closed strap loop for keys, toys, whatever you need on the Go!
  • Perfect for diapers, lunches (Waterproof laminate sandwiched between fabric eliminating contact with food; Laminate FDA GRAS), swimming, the Gym
GenY GO Bag Review & GIVEAWAY

Get Connected with Gen-Y

Website: http://gen-ydiapers.com/ Pinterest: http://pinterest.com/genydiapers/ Facebook: https://www.facebook.com/GENYdiapers Twitter: @GENYdiapers   Do you want to win a GO-Bag? Of course you do! Gen-Y is giving one Pin-n-Tell reader a chance to win! Just enter below. If you just can't wait and want your own GO-Bag now, I have great news for you. Gen-Y is giving Pin-n-Tell readers get a special 10% discount code. Just use the code GOpin when you place your order at http://gen-ydiapers.com/

Thursday, June 13, 2013

I am a Fat, Phat, Phat Fat kind of Girl!!!!

As you have guessed by my title I am fat. and today I have had it up to here with it. If any of you are overweight you know how hard it can be to clothes shop. I needed a dress for church that was not only modest and stylish but made me comfortable and happy to wear it.

After going to a handful of fat women's store (that's what I call them) aka. lane bryant, torrid, etc. I went home empty handed. not only did they have a small selection of dresses (or even a nice skirt) but they were all immodest, my meaning of modest is a dress that has sleeves, does not have a plunging neckline and is at least down to my knees if not longer. All the dress I found were sleeveless, strappy, holter toppish and were way to short. come on girls if you are overweight why would you want to show all that skin.
So i went home a bit grumpy thinking ok I guess my only option is to sew a dress myself. Pattern and material shopping is added to my to do list now.

This little quote fits my mood today perfectly


Give me chocolate and a nice dress PLEASSSSE!


Happy Shopping!!

Carrie


Ok I am back from my Joann's shopping trip. I was able to get 5 simplicity patterns for $5.00. Great deal considering these are $15.00-$18.00 each normally.

I decided to go with Simplicity Pattern # 2917


Here is the material I will be using. My husband helped me pick this out. 
What a great hubby. Love him.


Wednesday, June 12, 2013

Snow White Name Door Hanger


I have a fantastic craft to share today. Who doesn't love disney, yet alone a disney princess.
I made this personalized door hanger for one of my neice's. 

Supplies I used: Cricut, Happily Ever After cartridge, card stock, chipboard, ribbon, tulle, modge podge, hole punch, I Rock imaginisce bling and heat tool

\
First things first. to make the snow white I used the Happily Ever After cartridge. set it to 12" and cut all the pieces. Once all the pieces are cut, glue to chipboard, cut around design, punch 4 holes (2 in her hair area and 2 holes, 1 in each arm), modge podge over the entire surface and let dry. Once it is dry embellish with the I Rock Imaginisce bling. I use the white pearl style and added them to the bodice of her dress.


To personalize the bottom part. I used a Disney font and Make the Cut to Design the "Cami's Room". when mounting I started out with black chipboard, glued a white rectangle piece next, then added the personalized red glittery rectangle I cut the letter's out of. Again I punched holes (4 on the "cami's" piece, 2 on top, 2 on bottom and 2 on top of the "room" piece), modge podge and let dry. then bling it up again with the white pearlized stones.


Last and final step is to connect the pieced with red tulle (through each hole) and then add red and black ribbon to the tulle. 
and Ta-Da you have a fantastic personalized door hanger for your little girls room.

Happy Modge Podging!!!

Carrie

Linky Parties

Bubbly Nature Creations               DIY By Design                    Lil Luna
Someday Crafts                           the 36th Avenue            Yellow Bliss Road 
Nifty Thrifty Things                  Home Stories A to Z       Ladybugs Blessings
Not Just A Housewife                 Sugarbees Craft          Todays Creative Blog

Monday, June 10, 2013

Mini Beach Scrapbook


I finished one of my mini scrapbooks. I haven't put pictures in it yet, but since I just came home from an Oregon beach trip I choose to make my BEACH scrapbook from BoBunny.


Here is what it looked like before.
this was a 6 x 12" My Word Chipboard Album
With this blank slate there was so much room for creativity.

So grab some decorative scrapbook paper, ribbon, brads, eyelets, adhesive, glitter, sparkly gems and anything and everything.


the front of the "B"was covered in scrapbook paper and 4 colors of ribbon tied to the side of the B.


Backside of "B" and Front of "E" was covered in scrapbook paper.
I left this open for photos. 4 colors of ribbons tied onto the top of "E".


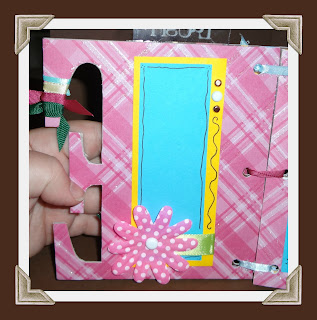
Backside of "E" covered in plaid pink scrapbook paper. Photo or saying area was done in yellow and blue with brown swirls and bronze and white brads, topped off with a polka dotted pink & white flower.


Front of "A" same as opposite side, but this side has a strip of green ribbon. also 4 colors of ribbon tied to side of "A".

Backside of "A" covered in yellow and white flower/butterfly scrapbook paper. photo area made with pink & brown paper. copper squares, swirl with ribbon and flowers punched out of the side topped with You are my Sunshine Sticker.


Front of "C" covered in same scrapbook paper. this one had a personally designed pink & yellow sun and lots of ribbons.


Back of "C"covered in brown & light blue polka dotted scrapbook paper. saying area made of turquoise and brown paper, outlined with brown marker with blue & pink flowers bradded in. the state OR was made from DIYthickers covered with stampendous - steel blue crushed glass glitter.


Front of "H" Covered in blue & brown scrapbook paper, photo area made with pink & brown paper with fun turquoise & pink clip. 2013 made with tim holtz ideology stripes grungeboard, covered with tim holtz distress ink - picked raspberry & pumice stone. finished with the 4 colors of ribbon tied to the bottom of the "H"

and there you have it. 
This was so much fun to put together. I still have a Love and blank ones from BoBunny to play with. 


Happy Crafting!!

Carrie


Linky Parties


Bubbly Nature Creations          DIY By Design                    Lil Luna
Someday Crafts                        the 36th Avenue

Friday, June 7, 2013

Wizard of Oz Shoot!!

On the last leg of my Oregon coast trip we we're driving between Cannon Beach and Portland. This is a gorgeous stretch of road, everything was budding and green. We came across this old run down house and I just had to stop and take a couple photos. It is part of my Wizard of Oz collection because it reminded me of the farmhouse that the famous Kansas tornado picked up and dropped in the magical land of OZ. 


The next set of photo's was a massive field of these red flowers. 
I decided to add these also to my Wizard of Oz collection.
I know that the flowers were poppies in OZ. 
but seeing this massive field covered in red flowers, screamed OZ to me. 
I kept seeing dorothy, toto, the lion, scarecrow and the tinman waltzing across this field, rejoicing in the fact that the Emerald City would be on the opposite side of the field. almost there.
It was an amazing sight.
I hope you all enjoy this series of photos.


Happy Viewing!!!

Carrie