Tuesday, November 20, 2012

Kids Santa Beard or Shepard Beard~~~ Free Pattern & Tutorial

Kids Santa Beard or Shepard Beard
Free Pattern & Tutorial

My mom has an amazing gal in her church that creates fantastic crafts with felt like felt food, kids play activities and such. Yesterday I got an email telling me she had a free pattern for a kids Santa beard. I thought ...Awesome, I have been meaning to make some beards for my kids to wear when they sneak items on porches during our family Secret Santa. As I got materials together I realized I had different colors to make beards for shepard/wisemen costumes as well. I have 4 kids and decided to make one of each color: White, Black, Brown and Blonde. The white one is all white, but all the other ones have 2 colors to give it more contrast. They turned out SOOOOO good and the pattern was simple. The kids can wear these beards at our church Christmas party since they need to dress up as shepards!

Here is her blog with the FREE pattern

Check out her shop BuggaBugs out on Etsy.
She is having a Buy 3 patterns get 1 Free sale on Black Friday


Saturday, November 10, 2012

Turn a New/Used Mason Jar into a Lantern ~ Wire Handle Tutorial

Turn a New/Used Mason Jar into a Lantern ~ Wire Handle Tutorial
Mason Jar Lantern Holiday Decals
We recently had our Wards Super Saturday. One of the hot items were a frosted Mason jar that had a wire handle and vinyl lettering. We had a hard time creating a good handle during the event. So I came up with a good way to attach a wire handle that was sturdy and easy to put on.

Supplies:
16 Gauge Construction wire ( I found mine at Lowes by the rebar)
Wide Mouth or Regular Mason Jar
Needle Nose Pliers with wire cutter

Wire length for Wide Mouth Jar is 4 Feet
Regular Mouth Mason Jar 3 1/2 Feet
Bend wire in half and make a small loop.
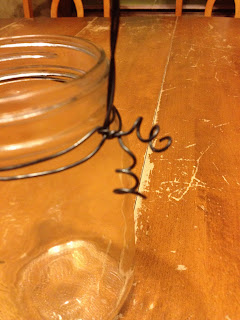
Start to bend loop end into a handle shape and twist wire as you go. Once you have the shape and height of handle you want take your pliers and do a small tight twist.
Once you have a small twist...spread wires straight to each side. Then have handle wire straddle the top of the jar and place twisted side tight to jar. Start to wrap each wire around jar until you come to the opposite side with the loop end of the handle.
Cris Cross the ends and do a single twist making sure the wires are under bottom thread where the lid screws on.


Then place both wire ends through loop of handle and pull tight. Make a single twist.
Wrap ends around jar until you come to other side. Your ends should start to get shorter. Cris Cross ends on the inside of the handle and wrap around outside of handle knot.
Take pliers and do 3-4 final twists
Trim ends so they are not too long to curl.
Use pliers to grab tip of wire end and curl it around the pliers nose. Release and get a new grip farther down the wire and keep going until it is curled all the way to twist. Adjust by pulling or pushing with pliers.

Now your ready to frost glass jar and attach vinyl or fill with lights or whatever.


The ONLY place I found this frosting spray was at Lowe's. It is a Valspar Brand. I did 20 jars with 1 can!
The BEST place to get vinyl is from www.thoughtsinvinyl.com by Janae Anderson.
These vinyls are on sale right now for $2....regularly $5
Here is the Link to her shop

                                     Mason Jar Lantern Holiday Decals

Thursday, November 8, 2012

Bubblegum Bracelets

Bubblegum Bracelets Tutorial
Hey Hoots. Here is a easy and fun kids craft you can do with your owlets. It can be for a party, ANY holiday  or just for something to do. I plan on doing this at my kids next birthday party!!!I really like the candy corn one I did on the top right. The only drawback to this craft is your kids want to start eating the bracelet the minute it is finished and on their wrist. LOL  Highly successful though!

Supplies:
 * Large or Small Gumballs in a variety of color.....
                  8 Large for adult/ 6 Large for Child
                  9 Small for Adult/ 7 Small for Child
*Ribbon in any color....I used purple and brown 1/4" Ribbon
*Metal Skewer Sticks
*Large Eyed Needle....remember you need to get the ribbon     through the eye.
*Needle nose Pliers....Optional, but extremely helpful.
We first start with putting a hole in each gumball. You may need to soften the bubblegum a little ...so microwave for 15 seconds.
Puncture each gumball with the metal skewer stick. Then barely poke it through the other side so you know where the hole goes and then I pull it out and puncture it directly where it is marked. Sometimes if you go all the way through is make the opposite end crack a lot. Once you have ALL your gumball poked with holes it is time to start stringing them up.
Cut each ribbon 24" long.

Fold your Ribbon in half and tie a knot in the middle. Place a Needle on one end. (I usually fold my Ribbon in half to get it through the needles eye)
This is when I would hand it over to each kid. They would place whatever color/size gumball they wanted on the needle. Once they pushed it as far as they could down the needle I would have them hand it back.
The eye of the needle was always a little too big to go through the gumball...so I would always have to use needle nose pliers to finish getting it through.
Once you get the gumball through the Needle, tie a knot and then hand it back to your little owlet and let them put on another gumball. Dunk, Rinse, Repeat. Half of the gumballs on one side of the middle knot and the other gumballs on the other half.


Tie each bracelet on their wrist and see them smile and beg to have a gumball to eat NOW!!!


Monday, November 5, 2012

Caramel Suckers!!! Just like having your own Sugar Daddy, but better!

Caramel Suckers........Just Like Having Your Own Homemade Sugar Daddy

* You CAN use this recipe for dipping Caramel or Caramel apples......it all has to do with what temperature to cook it to.

220 degrees for runnier Caramel perfect for apple dippers or on top of ice cream
234 degrees for Caramel Apples on a stick
245-250 degrees for stiffer Caramel Suckers or Caramel Squares.

This Caramel recipe comes from my sister LaVon's best friend Korrie who has some of the BEST recipes. Whenever I eat something extremely good at LaVons it usually is a concoction from Korrie!!!! These suckers are NOT rock hard, but still have a bit of chew to them, but they keep there shape. Yum Yum Yummmy!!! I made this batch for my mom to sell some Caramel Suckers at her Holiday Boutique.
Supplies
1 can Sweetened Condensed Milk
2/3 Cup Heavy Whipping Cream
1/2 Cup Butter
1 Cup Karo Syrup
1 Cup Brown Sugar
1 Cup White Sugar
1 tsp Vanilla
Candy Thermometer
Glass measuring cup with spout...at least 4 cup capacity
Hard Candy Molds...............you will need about 5-7 molds for this size recipe
Sucker Sticks
Pam Spray

 
Start with getting your candy molds ready. Spray all cavities lightly with Pam and have all sticks ready. My Owl molds have space to put candy eyes......get that ready as well.

Let's get started!!!! Combine in a glass measuring cup the Sweetened Condensed Milk with Heavy Whipping Cream and stir until blended well. Set aside.
In a large pot combine Karo syrup, White Sugar and Brown Sugar. Mix and cook on a high heat.

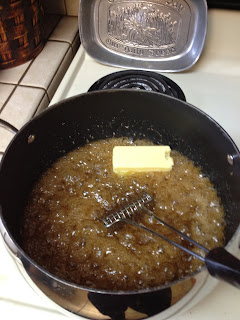
Once mixture starts boiling add butter. Once butter is melted allow mixture to achieve a hard boil, then turn down to a medium/high heat.
Gradually add condensed milk/heavy cream mixture so that it always has a slight boil. Make sure you are stirring constantly. Once all the cream mixture is added (clean measuring cup for later use) attach Candy Thermometer so that it is NOT touching the bottom, but is completely covered by the caramel mixture. Continue to stir until you reach desired temperature. See temperature chart at begining of post. You may have to turn heat up slightly, but don't go too high or you will burn it. It may take 7-10 minutes to reach the right temperature. Be patient. 

Once you reach desired temperature...remove pot from heat and stir in vanilla. Transfer caramel to glass measuring cup.

If you are making caramel apples.....you can start dipping and swirling them in the pot right now. If you want caramel squares.....put it in a deep cookie sheet lined with wax paper or a Pam sprayed container.

To make Suckers....................................

Start pouring Caramel into candy molds slowly until you get the hang of it's thickness.
Let Caramel set up for 2-3 hours inside molds.
Pop them out and
Hooray......Your cute Owl Caramel Suckers are done. Place them in sucker bags and crank the twist ties on.

This Caramel recipe has made me many friends. Enjoy!!!