Showing posts with label decor. Show all posts

Tuesday, July 30, 2013

Bathroom Wall Art - Epic Fail


I know, I know I have been really slacking on posts lately. 
So your going to love this one. 
We recently moved to our basement bedroom (because it's cooler down there, oh course) So my bathroom down there is lacking a little me. So I wanted to add some pop to my walls and still match my awesome shower curtain. 


To make the flower petals, Cut 1 1/2" wide strips of cardstock paper.
Outer Petal: 12" long
Middle Petal: 9" long
Inner Petal: 6" long
I used 3 different colors per flower.
Mix it up. 
Start from the Inner Petal, Hot glue the ends together, now add the middle petal, then the outer petal. Once your petal is completely glued together. Arrange the 5 petals and then hot glue the ends together. The next step will show you how to make the circle for the middle of your flower.


Using cardboard from cereal boxes or such, cut out 2 size circles (3 each). one 3" and the other 2" circles. grab your fantastic washi tape in the colors that you are working with. cover the circles with wash tape. then mount the 2" circle onto the 3" circle with mounting tape so that it has some dimension. I also took a black marker and drew a black line around the entire edge of both circles (not shown in above photo.


Using 2"circles again, put washi tape on them, outline with black marker and use for the butterflies. (I also made 3 extra 3" circles to just apply randomly on the wall.  To make the butterfly. You need (2) 11"x1" strips and (1) 5"x1" strip of cardstock. Starting with one of the longer strips, hot glue the ends together, repeat with 2nd strip, then glue both strips together. taking one side at a time. bend the loop to look like a top heavy, put glue in the crease and press. this makes the wing, now repeat on the other side. hot glue the 2" circle ontop of the wings. Bend the last strip in half curl the ends outward and then glue on back side of circle. tadahhh.

This was a fun project and adds that extra special pop.

Happy Creating!!

Carrie

Here is what the wall looked like the next morning.
Off I go to tweet and make it work. stay tuned!!!


Wednesday, May 8, 2013

Patriotic Wreath


I am in love with my new front door wreath.
It just screams patriotic joy. 
what's great about this wreath is that it can work for may and july.


Supplies to make this wreath

paper
scissors
black marker
glue gun
cardboard
tissue paper
love
Here's how I made it:

Start by cutting out a 7 1/2" circle from chipboard or cardboard
 (this was the back of cereal box)
Make 3 more circles for guidelines: 5", 3" and 1 1/2" circles. 
This is were you are going to place the scrolls.


To make the scrolls you will need 5 1/2" x 8 1/2" sheets of paper
If you want the black edges on the front you place the marks on the left and top.
On the back it will be all the way across the top and 1/2 way down the right side.


Now how to curl it. front facing down, grab the top left corner and start to roll diagonally towards right bottom side of paper. Once your scroll is complete secure it with a dab of hot glue. 


Getting your scrolls ready for the wreath. flatten the bottom end of scroll. Cut off about 2-2 1/2" off the bottom of your scroll. This will make it easier to add onto the wreath.


Start adding your scrolls. the cut off end of your scroll will line up with the pink 5" circle. 
while adding more work in one direction and overlap a little.


Your second layer is the green 3" circle and the 3rd layer is the orange 1 1/2" circle.
(don't let my 2nd layer photo confuse you, the one on the left. In that picture the red is the 1st layer and the white is the 2nd layer, it's from my first wreath)


When you get all 3 layers put on the middle hole is going to be a bit deep. To fix this I took small pieces cardboard and stacked them until it filled the hole. 


Now for the center. I cut out a 3" circle and covered it with red tissue paper. then applied it to the stacked cardboard pieces.


Your probably wondering, so how do I make the fantastic flowers to add to the front. 
You can find tutorials Here and Here


Happy Patriotic JOY!!!


Linky Parties


 Whatever You Want Wednesday              It's Party Time!
Lil Luna Link Party                               Wow Us Wednesday
Whatever Goes Wednesday              What I Whipped up Weds
make Bake Create Party                         Swing Into Spring
Round Up

Thursday, May 2, 2013

Missing Sock Station


I have been wanting to create this wall decor in my laundry room for quite some time. Not only does it look cool but with me living in an apt it is something that can be removed easily. How many of you guys have missing socks when you are doing the laundry. I know I do and I am always miffed at were to keep them until I can find the match. So I decided to make a wall dedicated to my lost sock syndrome.

To create this decor you will need the design done in vinyl 
(whether you do it yourself or buy it from someone else), twine, popsicle stick, 
clothespins and 2 nails or push pins.


After you clean your wall. start arranging your words on the wall. take the strip of paper off the back of your word (the piece of paper that has the grid). while you are arranging your design, remember that you can reposition things (the contact paper allows you to stick and unstick the design until you rub it on.


If you are to the point that you are happy with your design. Take your popsicle, credit card or anything flat that you can use to rub. rub over the design and then slowly start peeling the contact paper off, leaving the design on the wall. If while you are peeling the contact paper the design comes up, press back down, rub again and try to peel off again.

After I finished applying my vinyl design. I took a long strand of twine and using to pushpins, tacked to the wall leaving a bit of slack in the twine.  Add clothes pins and missing socks. and you are now done.

Happy Crafting!!


Linky Parties


Transformation Thursday                 Hooking Up w/HOH
Catch a Glimpse Inside                    Blog Stalking thursday
Chic & Crafty Party                       Whatever Goes Wednesday
Best DIY Projects                           Simple Create Link Party
Show & Tell Friday                                Frugal Friday
the Weekly Creative LP                           I'm Lovin It
Make Bake Create Party                      Shine on Fridays
Friday Flash Blog                                   Be Inspired
Strut Your Stuff                               Show & Tell Saturday
Spotlight Saturday                           Share Your Creativity
Weekend Bloggy Reading              Sunday Show Off LP
Think Pink Sunday                              It's Party Time
Mop It Up Monday                    More the Merrier Monday

Thursday, January 3, 2013

New Drink Charms for all Occassions

Our Newest Items!!!

We have come out with some fun new drink/wine glass charms for all Occassions.

We can do names, designs, unlimited options. 
You can check them out at our etsy shop: http://www.etsy.com/shop/CraftyNightOwls


Send us some feedback on how you like or don't like them.

Happy Crafting and keeping hydrated :)


Sunday, December 23, 2012

Wrapping & Decorating a present with ONLY wrapping paper.


We all end up with left over strips of wrapping paper when wrapping our gifts. So instead of throwing them out reuse them and turn them into some fun curls to decorate the top of your gift.


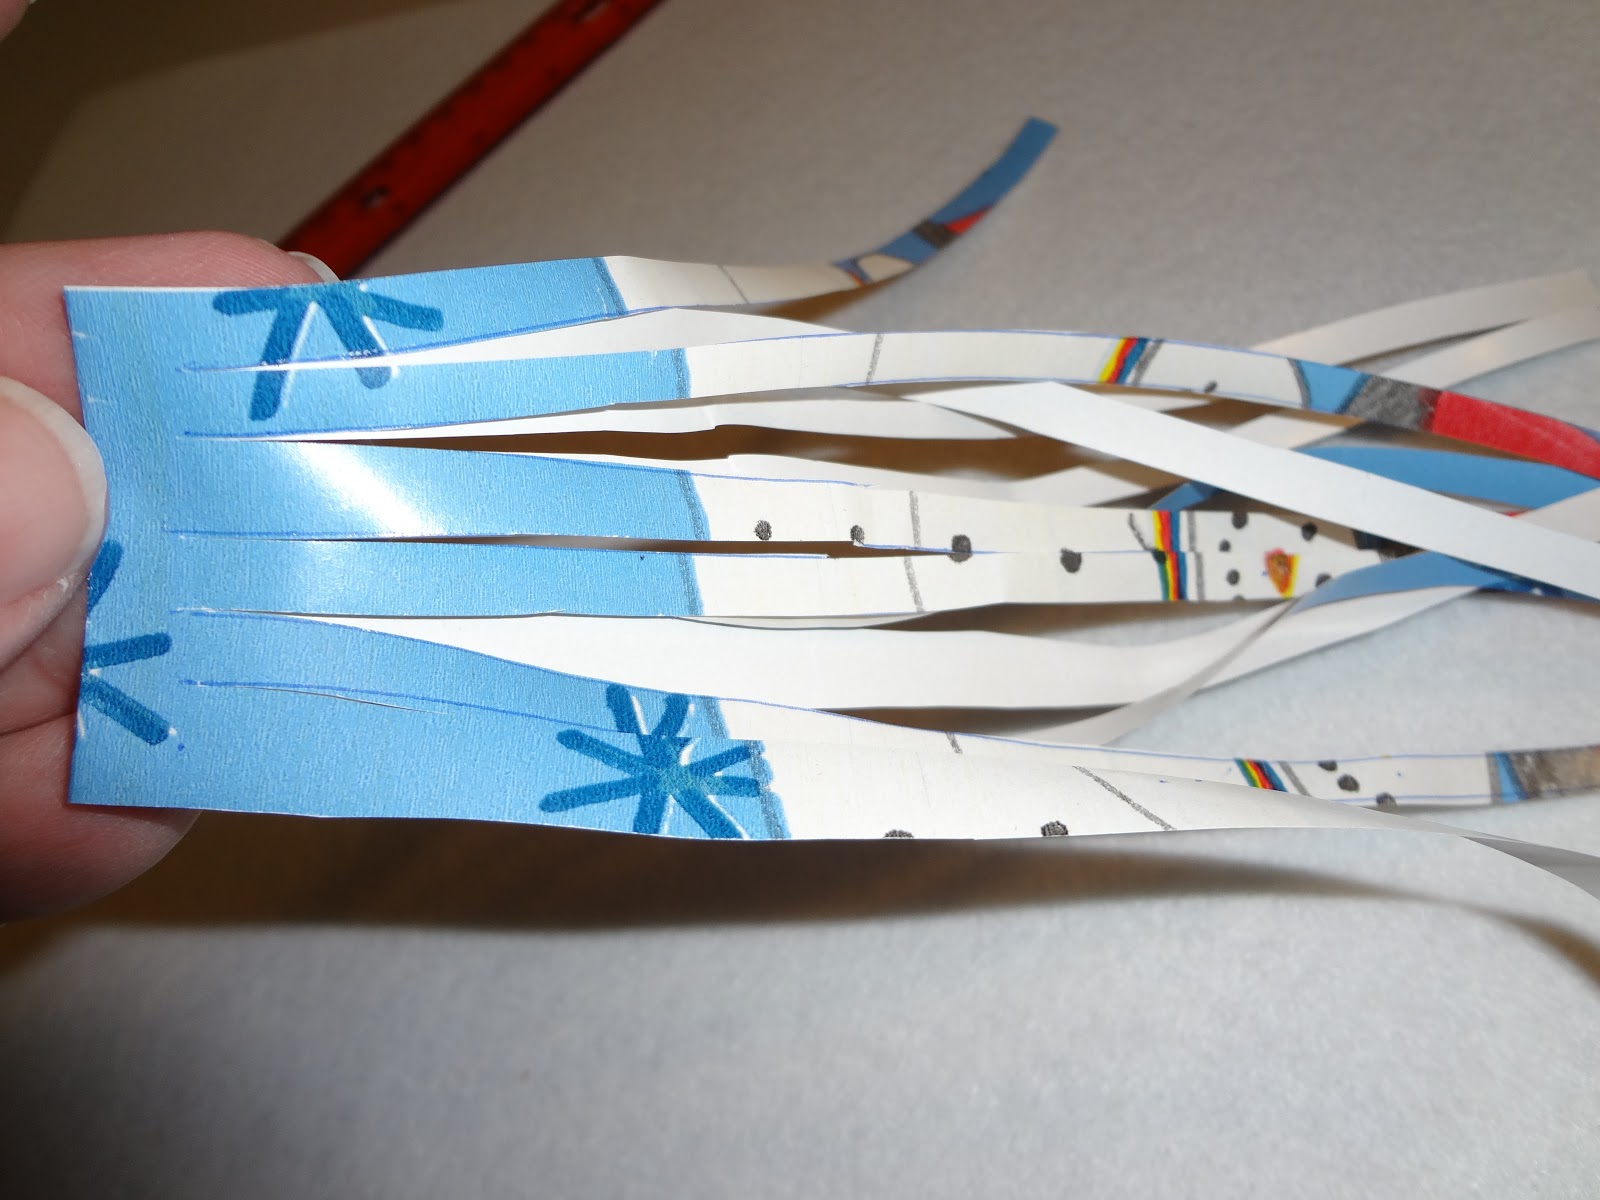
Fold a strip of wrapping paper in half. having the crease at the top is important. 
 Now if you aren't comfortable cutting in straight lines or are a bit of a perfectionist then take your ruler and draw lines down your paper. You can choose how wide the stripes are. 
 Leave at least a 1/4 on an inch at the top the won't be cut. This is the side that has been creased. 
 take your scissors and cut up each line. remember stop at the end of the line. Do not cut all the way through. 
 Open your scissors and place one of the tips of the scissors on the underside of the 1st strand.
you are going to CAREFULLY run your scissors down the back of the strand. this will curl it. Don't pull to hard or the strand will break off. 
 Here is what your curls will look like once you are done with each strand.
 I always fold the creased side in half and then place a piece of tape over the fold.

 Now place on your wrapped gift.
 To make a gift tag with more of your leftover wrapping paper. Cut around one of the designs. I chose to cut around one of the snowflakes. 
 Once I cut the 1 snowflake out I applied glue to the back of it and applied it to the backside of another piece of wrapping paper. 
 then cut around the snowflake again.
 I folded over a square piece of leftover paper and applied my snowflake and took a black marker to it. 

It would have also been very fun to turn one of the snowmen on the paper into a tag. 

Hope you have some fun with this new technique.


Saturday, November 10, 2012

Turn a New/Used Mason Jar into a Lantern ~ Wire Handle Tutorial

Turn a New/Used Mason Jar into a Lantern ~ Wire Handle Tutorial
Mason Jar Lantern Holiday Decals
We recently had our Wards Super Saturday. One of the hot items were a frosted Mason jar that had a wire handle and vinyl lettering. We had a hard time creating a good handle during the event. So I came up with a good way to attach a wire handle that was sturdy and easy to put on.

Supplies:
16 Gauge Construction wire ( I found mine at Lowes by the rebar)
Wide Mouth or Regular Mason Jar
Needle Nose Pliers with wire cutter

Wire length for Wide Mouth Jar is 4 Feet
Regular Mouth Mason Jar 3 1/2 Feet
Bend wire in half and make a small loop.
Start to bend loop end into a handle shape and twist wire as you go. Once you have the shape and height of handle you want take your pliers and do a small tight twist.
Once you have a small twist...spread wires straight to each side. Then have handle wire straddle the top of the jar and place twisted side tight to jar. Start to wrap each wire around jar until you come to the opposite side with the loop end of the handle.
Cris Cross the ends and do a single twist making sure the wires are under bottom thread where the lid screws on.


Then place both wire ends through loop of handle and pull tight. Make a single twist.
Wrap ends around jar until you come to other side. Your ends should start to get shorter. Cris Cross ends on the inside of the handle and wrap around outside of handle knot.
Take pliers and do 3-4 final twists
Trim ends so they are not too long to curl.
Use pliers to grab tip of wire end and curl it around the pliers nose. Release and get a new grip farther down the wire and keep going until it is curled all the way to twist. Adjust by pulling or pushing with pliers.

Now your ready to frost glass jar and attach vinyl or fill with lights or whatever.


The ONLY place I found this frosting spray was at Lowe's. It is a Valspar Brand. I did 20 jars with 1 can!
The BEST place to get vinyl is from www.thoughtsinvinyl.com by Janae Anderson.
These vinyls are on sale right now for $2....regularly $5
Here is the Link to her shop

                                     Mason Jar Lantern Holiday Decals