Mending Pants ~ Fun and Practical !!!!
I am sure girls are capable of putting holes in their jeans, but I am positive that my boys are pro's at it. I recently mended 15 pairs of jeans....2 which were my husbands and mine...the rest were my 2 boys and 1 nephew. Another thing I find odd is it is always the LEFT knee that is worse! Don't know! Yes, I let it pile up because I was dreading it and had previous failures when it came to mending. I researched some different ways and tried something out that was much easier and more successful. I ended up starting with basic looks then started having fun with fabrics...then into making monster faces and mustaches.
Here are what some of my failures looked like. The first one (pants are wrong side out) I made the patch too small and used too dense of a denim. The pants started tearing at the top. The second one I was too messy with the glue and it just looks dirty all the time.
Here are some products that I found helped make the mending easier.
Tear Mender.....I know there are other brands, but this is what I found and it is waterproof
Pellon Heavy Duty Wonder Under.......it is double sided
Iron
Fun cotton fabrics
Felt
Embroidery Thread
Medium Ric Rack
You don't need all of these items for every mend, but I will show you some examples of what I used for what!
Basic jean shred, but not a complete hole!
These jeans are starting to shred or get worn in areas, but there is not a huge hole yet. I used a simple blue cotton fabric that wouldn't show too much through the shred. I found using denim as a patch was too thick and hard on the pants ....so I use a light weight fabric. My son has a pair of uniform khaki pants that came with a type of patch from the get go and they have lasted FOREVER!! It is some sort of interfacing that has worked beautifully, but I haven't totally figured it out! Anyone know?
Turn your jeans right side out. Figure out what size patch you need. Make sure it is wide enough and tall enough and I personally patch both side regardless if it is shredding.....I am taking the time to patch...let's do it now instead of later when it does fray!
Option 1
Turn the pants inside out...stick a piece of wax paper inside the pant leg under the tear so the mending glue does not leak through. Figure out what size of patch you need and cut it out...rounding the corner. Simply drizzle a small amount of mending glue directly on top of the patch(whatever side of the fabric you want to show though) and then smear in all over with your finger.....make sure you get the corners well. Don't worry about the glue on your finger...you can rub it off. Work fast and once it is covered in glue apply it to the jean hole/fray area and smooth out flat. Let it dry an hour then turn it right side out then apply a tiny amount to the top of the fray to keep it from fraying farther. Works great and is very sturdy. (If you are doing multiple patches you can take the wax paper out now and use on your next patch...it does not need to be there while it's drying)
Option 2
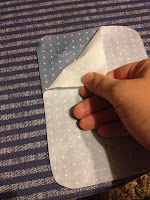
Figure out what size patch you need and cut a piece of fabric....I like using a basic cotton. Iron on pellon to right side of fabric. Then cut out and curve edges. Peal off the paper part of the Pellon Wonder Under (sometimes I can get the paper off easy by scratching with my finger on top of the paper at the corner...make sure it is completely cooled) and iron in place as your patch. Follow the directions on the Pellon paper. Make sure you use a damp cloth when you are first ironing it to your jeans...it makes the glue part get sticky. Then you can iron directly to it. Make sure the edges do not come off.
Once cooled or dried...turn it right side out and apply a little mending glue to the frayed part to help it not fray more! Your done! Sometimes I have to add Mending glue to the corners after a few washes, but it is golden after that!
Same thing done with this hole in the crotch but I used a smaller patch!


Here's an example of a big hole patch job!
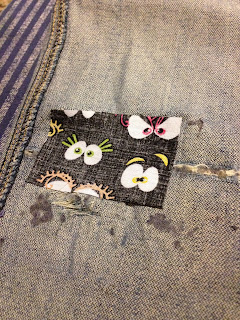
Here is where you have options of what you want to be visible through the hole. Rummage through all your fun printed fabric or make a fun Monster/Mustache Face. You will be utilizing option 2 from above along with these instructions, but you will use those steps last.
( NOTE: Extra Instructions for the Monster/Mustache Face are in Red. You need Felt in whatever color you want for mouth and eyes, Med. Ric Rack for teeth, Embroidery Floss and needle Sorry I don't have step by step pictures....I did these for my sister and was just having fun with it not thinking to take pictures!)
Start Here:
Turn your pants inside out and place a piece of wax paper inside the leg under the hole to prevent glue from leaking through. Decide what shape you want to cut out of your patch: rectangle, circle, diamond...whatever you want to accommodate the print or look your going for!
Take your printed fabric and cut out a piece big enough to cover the hole . Make sure it is about 1/2'-1" larger than the hole all around! Face the printed fabric print side down on top of the hole. (note these pants are being RE-patched since I did a horrible job last time hence the glue spots)
I used Red or Sparkling Black Felt for the Monster/Mustache Face Patch and made the patch 1" larger than the hole!
Now you are going to use the Option 2 from above and lay a Pellon Wonder Under Patch on top of the printed fabric patch. Do all the same instructions and stop when it comes time to turn the pants right side out!
Turn your pants right side out and you should see the printed fabric show through. The Jean edges will be loose......no worries it is suppose to be that way! Occasionally I have to cut a little more of the jean edge to make the print show up better....hence the Batman symbol.
Now it is time to add the Rich Rack. You need to cut 2 pieces long enough to fit across PLUS an extra inch on both ends. Burn the ends of the Ric Rack. Tuck the Ric Rack under the loose flap of the jean....making sure the ends are completely covered. Make sure the Ric Rack hangs below the edge just enough to look like teeth and then pin. Now it is time to hand stitch along the entire edge of the mouth (jean hole)...I like using a blanket stitch. Stitch through the entire layers of the pants. The mouth should be done...now cut out eyes, mustache or whatever you would like to add to your look. I hand stitched it all using a blanket stitch.

Once you complete any jean edge trimming it is time to seal the loose edges. Use a Q-tip and dip it in the mending glue and apply the glue to the underside of the loose jean edge. I found using my finger for this instead of the Q-tip was too messy. Get all the loose edges glued and press hard to adhere it. Let it dry an hour and reapply glue if any parts come undone. Optional hand stitching the edges if you want to.
Sometimes I have to add Mending glue to the corners of the inside patch after a few washes, but never more after that!
You don't need to glue...you already hand stitched!
Hope you found this tutorial useful and we would love to see what you come up with......post a comment and picture!!!
Shauna
Linky Parties
Craftberrybush
Common Ground


.JPG)
.JPG)
.JPG)


