Wednesday, March 27, 2013

10,000th View Giveaway


I can't tell you how excited I was when I checked my blog today
 and discovered that we hit our 10,000th view. 
Hooray (insert Happy dance)

So to celebrate this milestone 
we are going to do a giveaway


To enter the giveaway all you need to do is leave a comment on this post.
The giveaway will run until noon on April 1st 2013.

The Prize: You will receive our most popular quilt pattern : Larry the Lion.
this is a pdf pattern so if you win you will receive it through email.

Spread the love and pin it, Facebook share it, tweet about it.

Thank you to all our fantastic followers and readers.

Good Luck!


Tuesday, March 26, 2013

You've Been Egged! The funnest Easter activity with your Kids!

You've Been Egged!

Egging someone's house.........Usually this is something you DON'T want your kids doing, but I'm telling you......this will become a new family tradition! My kids had the time of their lives tonight.....I told them to dress up in black so they could go sneaking around and they came downstairs in Jedi Cloaks and Batman Outfits. Whatever floats their boat! This activity is a great way to start getting people in the Easter spirit and starting to remember what Easter is truly about! 

 Here is what you do. Figure out who's house you want to egg. Buy 10 plastic eggs per house you want to egg. Fill 9 of the eggs with candy or goodies and leave 1 egg Empty! Yes, Empty. Print out this free Printable (2 per page) and cut it in half (don't forget to bring tape with you). 


select above document and print


When it is dark get your crew ready to sneak around and deliver the eggs in your chosen friends front yard and tape the "You've Been Egged" poem on the front door. Get back in the car undetected! Done!  Are you "egg"cited yet? Have fun with it and let us know if you did anything different or what your kids wore!!!

Shauna


Linky Parties

Monday, March 25, 2013

DIY Mickey Head Embossing Folder


I recently purchased my first Big Shot for the sole purpose of adding a little more texture to my projects. I need TEXTURE and one way is embossing the paper with patterns. I received 2 embossing folders with my bundle. But hey if you knew me you would know 2 folders is not going to be enough for me, but at the same time paying the high prices on these folders isn't me either. So after doing some research on possibilities of making some folders on my own. I created a mickey head design, cut it out and mounted it. I think it is a good first try. I am going to keep fiddling with these and fill my folder box. 


To make these I used my cricut, cardboard from an oreo box, glue and tape to keep the 2 sides together. 


 Happy Embossing!!

Linky Parties


Sunday, March 24, 2013

Make Your Own Personalized Birthday Cards


MAKE YOUR OWN PERSONALIZED BIRTHDAY CARDS

I'm a real believer in making things a little more special by making them yourself when you can. Cards are one of those things. They can be easy, economical and fun to do. And, they are so appreciated by those you give them to because you spent the a little extra time in making something just for them.

I recently made birthday cards for three of my grandchildren. They are always thrilled when I make one, personalizing it with their name on it. These can give you some ideas for you to try this yourself. All words and text on my cards are handwritten. Don't be afraid to use your own handwriting, this can make the card all the more personal and special. 


 The first card shows a fun way to incorporate the person's age they are turning.  Here, my grandson is turning 6.  First, when making a card from scratch, find the envelope you want to use to get measurements for the card. [it's a real "bummer" to finish the card only to find that it  doesn't fit in your envelope] These cards all fit into a regular business size envelope.  I always use a nice heavy weight/card stock paper for the body of my cards. With this one, it was a lovely green "linen" paper. I work out a design idea in my head for my card and start gathering the supplies I need.


I folded the card in half and then cut and adhered a coordinating piece of scrapbook paper to the front, leaving a border of green showing around this piece. I measured the front to give me three small pieces, spaced equally apart, to complete the front design. I wrote the top text in the top square, then the "6", in the middle one.  I cut the "eyes" out of a piece of scrapbook paper [you could draw some eyes or cut some out of a magazine], folded in half so it could be lifted up to reveal the words, "It's YOU", hidden underneath. [how fun is that!] The front is finished with making lines with a fine tip marker running along a ruler, going around the inside of each of the three squares.  I did dots with a black marker around the outside edge of the scrapbook paper. This helped "frame" the whole card design.


On the inside, I applied two triangle pieces of paper I cut out of the same scrapbook paper I used on the front of the card. I glued a small green rectangle piece of paper in the middle of each triangle. I then applied a rectangle piece of solid colored paper on top, in the middle, overlapping the triangle tips. I wrote his name in the top piece, "Happy Birth-Day!" in the middle and "I Love You" in the last.  I finished the inside with lines and dots, like the front.  There was room for my signature at the bottom.


The middle card was made for one of my granddaughters who was turning 13. 


I used a lavender card stock for the body of the card. I cut a rectangle piece of patterned scrapbook paper and adhered it to the front of the card then glued on two triangle pieces of coordinating plain colored papers.
I adhered a Dollar Store "flower" embellishment on top of the yellow triangle. Lastly I drew on some swirls with a fine tipped purple marker, added dots around outside edge of card and wrote "For Your Special Day" in the bottom right corner.
This and the third card are both "tri-fold" cards. You have to score, make two folds, so that there are three panels across the card when it lays open. On the inside panels of this card, I first adhered pieces of scrapbook paper [same as front of card] , leaving a edge of the card's lavender paper showing.  Then, cut
out three pieces of white paper cutting scalloped bottom edges.  Adhere these, one to the top of each of the
three panels. [I only applied glue along the top edge of the middle white piece so it could be lifted to reveal "13th".]  Add the dots, with a marker, around the outside edge of card and finish by writing the the text:  HAPPY   BIRTHDAY  SARIYAH  [at top]  and "To My Awesome Granddaughter" in the middle, ending with "I Love You!" at the bottom.


The third card was made for one of my grandson's lst birthday. I used a blue card stock paper for card's body. Make the three panel-two folds in the card. I adhered a piece of green scrapbook paper on the front panel, leaving a border of the blue paper showing.  I adhered a strip of coordinating patterned paper, going across near the top of the card. [To cut the strip to fit the card, before adhering the green paper, cut a strip, longer than the width of the card, of the patterned scrapbook paper.  Lay this strip underneath the green paper [in the diagonal direction it will go] and trace around the top right corner onto the scrapbook paper with a pencil and a line along the left side.]  And arrow was sdrawn and cut out of the blue paper and outlined with a blue maker. It was adhered to the card as shown with a "flower" shape glued on top of the arrow's end. A button was glued on top of flower. Dots were added with a marker along inside edges of papemr designs and the words written at the bottom right of card.


The three inside panels have the same scrapbook paper as the front  adhered [dotted paper on left and right panel and green in center one], leaving a border of blue card body showing around each panel piece. I cut three pieces of white paper to fetthe tops of each panel, scalloping the bottom edges and leaving room for a strip of scrapbook paper to be adhered to these bottom edges. I then glued these pieces to the tops of the panels. One word was written in each top panel piece: HAPPY   BIRTHDAY  EVERETT!  On the left and right panels, blue and white papers have been layered in the bottom centers of those panels.  The center panel has a "hour-glass" shaped piece of cut paper glued in bottom center with a heart cut from the blue paper and glued in the middle of the hour glass. The birthday year "1" was written on the left panel, "I Love You" on the center one, and "smiley, happy, Adorable on the right. Dots were added around the borders with a marker as a finishing touch.
"Made especially for you by Grandma" was written on the back of each card.


These were a real joy to make.  Cards can be made for any occasion and any age or gender will treasure one. Give it a try. You might be so please with the outcome, you may not even want to give them away. :)  


Saturday, March 23, 2013

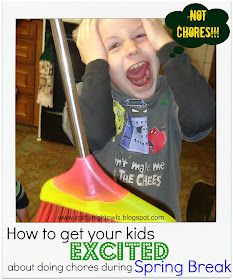
How to get kids Excited about Chores during Spring Break!


Spring Break is just around the corner and so is Spring Cleaning. I am not always excited to get scrubbing the entire house and my kids are definitely not on the band wagon either. Here's an idea to help your kids get excited to help out during Spring Break/Cleaning. It's not just cleaning, but some other types of service activities as well.

Spring Break Scavenger Hunt


  click on the above image, save to your computer and print.

 I was AMAZED how excited they got while using this scavenger hunt and how they were begging me for opportunities to do work and such. Each child is different and there are many ways you can utilize this hunt. All you need to do is click link above..... print it off (2 per page) and put each of your kids name on one. Sit down and have a pow-wow with your kids on rules, prizes, goals and such and then decide where their papers are going to be.(fridge door, kitchen wall, etc.) Sometimes it's nice to hear what your kids think would be a great prize.....sometimes you can get off cheaper than you think. LOL I personally don't have scheduled chores for the week......the Spring Break Scavenger Hunt will be all they have! 

Goal Options:

1~ Have each child pick a Goal of what points they want to get during the week......it can be   
     followed up with a prize if they meet their goal or simply the satisfaction of completing a goal.
2~ The parent picks a Goal amount for each child with or without a reward at the end of the week.
3~ Pick a point Goal for the Entire family to accomplish with a family prize at the end of the week.

Who marks off each box?
  Well, that is up to you. The parent can be in charge of marking it or you can have your kids on the honor system. I personally checked to see if it was completed and then tell the kids they can mark it off or show my non-reading kids which box to mark. They liked marking it themselves.


Prizes Options

You could have a prize for a certain goal reached OR you could have a prize chart that has prizes at each amount level. For example candy when reached 100 pts, coloring book at 200 pts, trip to the park at 300 pts and so forth. I support all you non-prize parents, but me personally my kids have sooo much more motivation when they have something tangible to earn or a prize involved.

Here are some fun prize ideas:

Food Related:    Candy, Ice Cream bars, Special Baked treat, McDonald's, Pizza or etc.

From Store or $: Cash, Trip to $ Store, Coloring Books, Sidewalk Chalk, Bubbles, Toy or etc.

Others or Free: Trip to Park, Zoo, No Chores for the Day, Water Fight Party, Stay up 1 Hour    
                            Later one Night, Go to Movies or Rent Movie or etc.

Hope you find this post to be useful and successful! 

Shauna

Linky Parties


SixSistersStuff.com

Thursday, March 21, 2013

Mending Holy Jeans~ Fun and Practical !!!

Mending Pants ~ Fun and Practical !!!!


I am sure girls are capable of putting holes in their jeans, but I am positive that my boys are pro's at it. I recently mended 15 pairs of jeans....2 which were my husbands and mine...the rest were my 2 boys and 1 nephew. Another thing I find odd is it is always the LEFT knee that is worse! Don't know! Yes, I let it pile up because I was dreading it and had previous failures when it came to mending. I researched some different ways and tried something out that was much easier and more successful. I ended up starting with basic looks then started having fun with fabrics...then into making monster faces and mustaches.

 Here are what some of my failures looked like. The first one (pants are wrong side out) I made the patch too small and used too dense of a denim. The pants started tearing at the top. The second one I was too messy with the glue and it just looks dirty all the time.


Here are some products that I found helped make the mending easier.

Tear Mender.....I know there are other brands, but this is what I found and it is waterproof
Pellon Heavy Duty Wonder Under.......it is double sided
Iron
Fun cotton fabrics
Felt
Embroidery Thread
Medium Ric Rack

You don't need all of these items for every mend, but I will show you some examples of what I used for what!

Basic jean shred, but not a complete hole!
 These jeans are starting to shred or get worn in areas, but there is not a huge hole yet. I used a simple blue cotton fabric that wouldn't show too much through the shred. I found using denim as a patch was too thick and hard on the pants ....so I use a light weight fabric. My son has a pair of uniform khaki pants that came with a type of patch from the get go and they have lasted FOREVER!! It is some sort of interfacing that has worked beautifully, but I haven't totally figured it out! Anyone know?
Turn your jeans right side out. Figure out what size patch you need. Make sure it is wide enough and tall enough and I personally patch both side regardless if it is shredding.....I am taking the time to patch...let's do it now instead of later when it does fray!
      Option 1
 Turn the pants inside out...stick a piece of wax paper inside the pant leg under the tear so the mending glue does not leak through. Figure out what size of patch you need and cut it out...rounding the corner. Simply drizzle a small amount of mending glue directly on top of the patch(whatever side of the fabric you want to show though) and then smear in all over with your finger.....make sure you get the corners well. Don't worry about the glue on your finger...you can rub it off. Work fast and once it is covered in glue apply it to the jean hole/fray area and smooth out flat. Let it dry an hour then turn it right side out then apply a tiny amount to the top of the fray to keep it from fraying farther. Works great and is very sturdy. (If you are doing multiple patches you can take the wax paper out now and use on your next patch...it does not need to be there while it's drying)

                                                                               Option 2


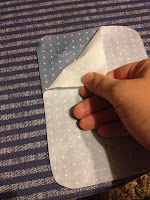
Figure out what size patch you need and cut a piece of fabric....I like using a basic cotton.  Iron on pellon to right side of fabric. Then cut out and curve edges. Peal off the paper part of the Pellon Wonder Under (sometimes I can get the paper off easy by scratching with my finger on top of the paper at the corner...make sure it is completely cooled) and iron in place as your patch. Follow the directions on the Pellon paper. Make sure you use a damp cloth when you are first ironing it to your jeans...it makes the glue part get sticky. Then you can iron directly to it. Make sure the edges do not come off.

Once cooled or dried...turn it right side out and apply a little mending glue to the frayed part to help it not fray more! Your done! Sometimes I have to add Mending glue to the corners after a few washes, but it is golden after that!

Same thing done with this hole in the crotch but I used a smaller patch!


Here's an example of a big hole patch job!


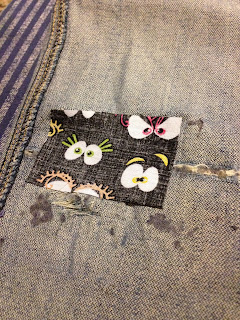
Here is where you have options of what you want to be visible through the hole. Rummage through all your fun printed fabric or make a fun Monster/Mustache Face. You will be utilizing option 2 from above along with these instructions, but you will use those steps last.
( NOTE: Extra Instructions for the Monster/Mustache Face are in Red. You need Felt in whatever color you want for mouth and eyes, Med. Ric Rack for teeth, Embroidery Floss and needle Sorry I don't have step by step pictures....I did these for my sister and was just having fun with it not thinking to take pictures!)

Start Here:
Turn your pants inside out and place a piece of wax paper inside the leg under the hole to prevent glue from leaking through. Decide what shape you want to cut out of your patch: rectangle, circle, diamond...whatever you want to accommodate the print or look your going for!

Take your printed fabric and cut out a piece big enough to cover the hole . Make sure it is about 1/2'-1" larger than the hole all around! Face the printed fabric print side down on top of the hole. (note these pants are being RE-patched since I did a horrible job last time hence the glue spots) 
I used Red or Sparkling Black Felt for the Monster/Mustache Face Patch and made the patch 1" larger than the hole!

Now you are going to use the Option 2 from above and lay a Pellon Wonder Under Patch on top of the printed fabric patch. Do all the same instructions and stop when it comes time to turn the pants right side out!

Turn your pants right side out and you should see the printed fabric show through. The Jean edges will be loose......no worries it is suppose to be that way! Occasionally I have to cut a little more of the jean edge to make the print show up better....hence the Batman symbol.
Now it is time to add the Rich Rack. You need to cut 2 pieces long enough to fit across PLUS an extra inch on both ends. Burn the ends of the Ric Rack. Tuck the Ric Rack under the loose flap of the jean....making sure the ends are completely covered. Make sure the Ric Rack hangs below the edge just enough to look like teeth and then pin. Now it is time to hand stitch along the entire edge of the mouth (jean hole)...I like using a blanket stitch. Stitch through the entire layers of the pants. The mouth should be done...now cut out eyes, mustache or whatever you would like to add to your look. I hand stitched it all using a blanket stitch.

Once you complete any jean edge trimming it is time to seal the loose edges. Use a Q-tip and dip it in the mending glue and apply the glue to the underside of the loose jean edge. I found using my finger for this instead of the Q-tip was too messy. Get all the loose edges glued and press hard to adhere it. Let it dry an hour and reapply glue if any parts come undone. Optional hand stitching the edges if you want to.
Sometimes I have to add Mending glue to the corners of the inside patch after a few washes, but never more after that!
You don't need to glue...you already hand stitched!


Hope you found this tutorial useful and we would love to see what you come up with......post a comment and picture!!!

Shauna
Linky Parties
Craftberrybush
Common Ground