We'll I know you all have been missing me this week. I have been busy and tired. I started a new job this week. I haven't worked outside the home for almost 5 years now and felt like it was time to do that scene again. Not only will it pay for me and my hubbies annual anniversary trip in November but it will buff up our savings. I am doing a receptionist/Accounting position and loving it. I love to be kept busy and I also love to learn new things.
I just don't know how I got through my 2nd day though. I was running on 3 hours of sleep and am also trying to get used to getting up at an early hour. I am a night owl at heart (as you couldn't tell by my blogs name) and I struggle with sleep in general. Yet another plus of a job, It will help put me back on a better schedule. I just have to learn to juggle work and play now. Do not worry I will still be blogging away and sharing/teaching you many things in the future. I love my blog and my sweet fans.

Thursday, August 29, 2013
Wednesday, August 21, 2013
My First Mixed Media Art Piece

Happy Mixing
Carrie
Monday, August 19, 2013
Salsa Leedo's Resturant Review - Riverton, UT

My Hubby and I have lived here in Riverton, UT for over 1 1/2 years now and have been searching high and low for some decent mexican food. When we lived in Plano, TX we had to leave not only the state but our favorite mexican resturant called Cafe Milagro. They had THE best mexican food I have ever had in the USA. So back to UT. When we came back to UT it has been terribly hard to find a decent replacement. Tonight we decided to try out a local Riverton location called "Salsa Leedos". Now it's not Cafe Milagro but it is the best mexican resturant we have been to in this state so far.
A bonus for families with children: on Monday evening's kids eat free.
They start you out with not only salsa and chips but also a side of refried beans & cheese.
We ordered a carna asada burrito and a chile verda burrito. both can piping hot, smothered with cheese and sauce with a side of rice, beans, sour cream and guacamole.
Both of our dishes were excellent, the staff was friendly and very helpful. We will be going back to try some of there other great dishes in the future.
Happy and Full!!!
Carrie
Friday, August 16, 2013
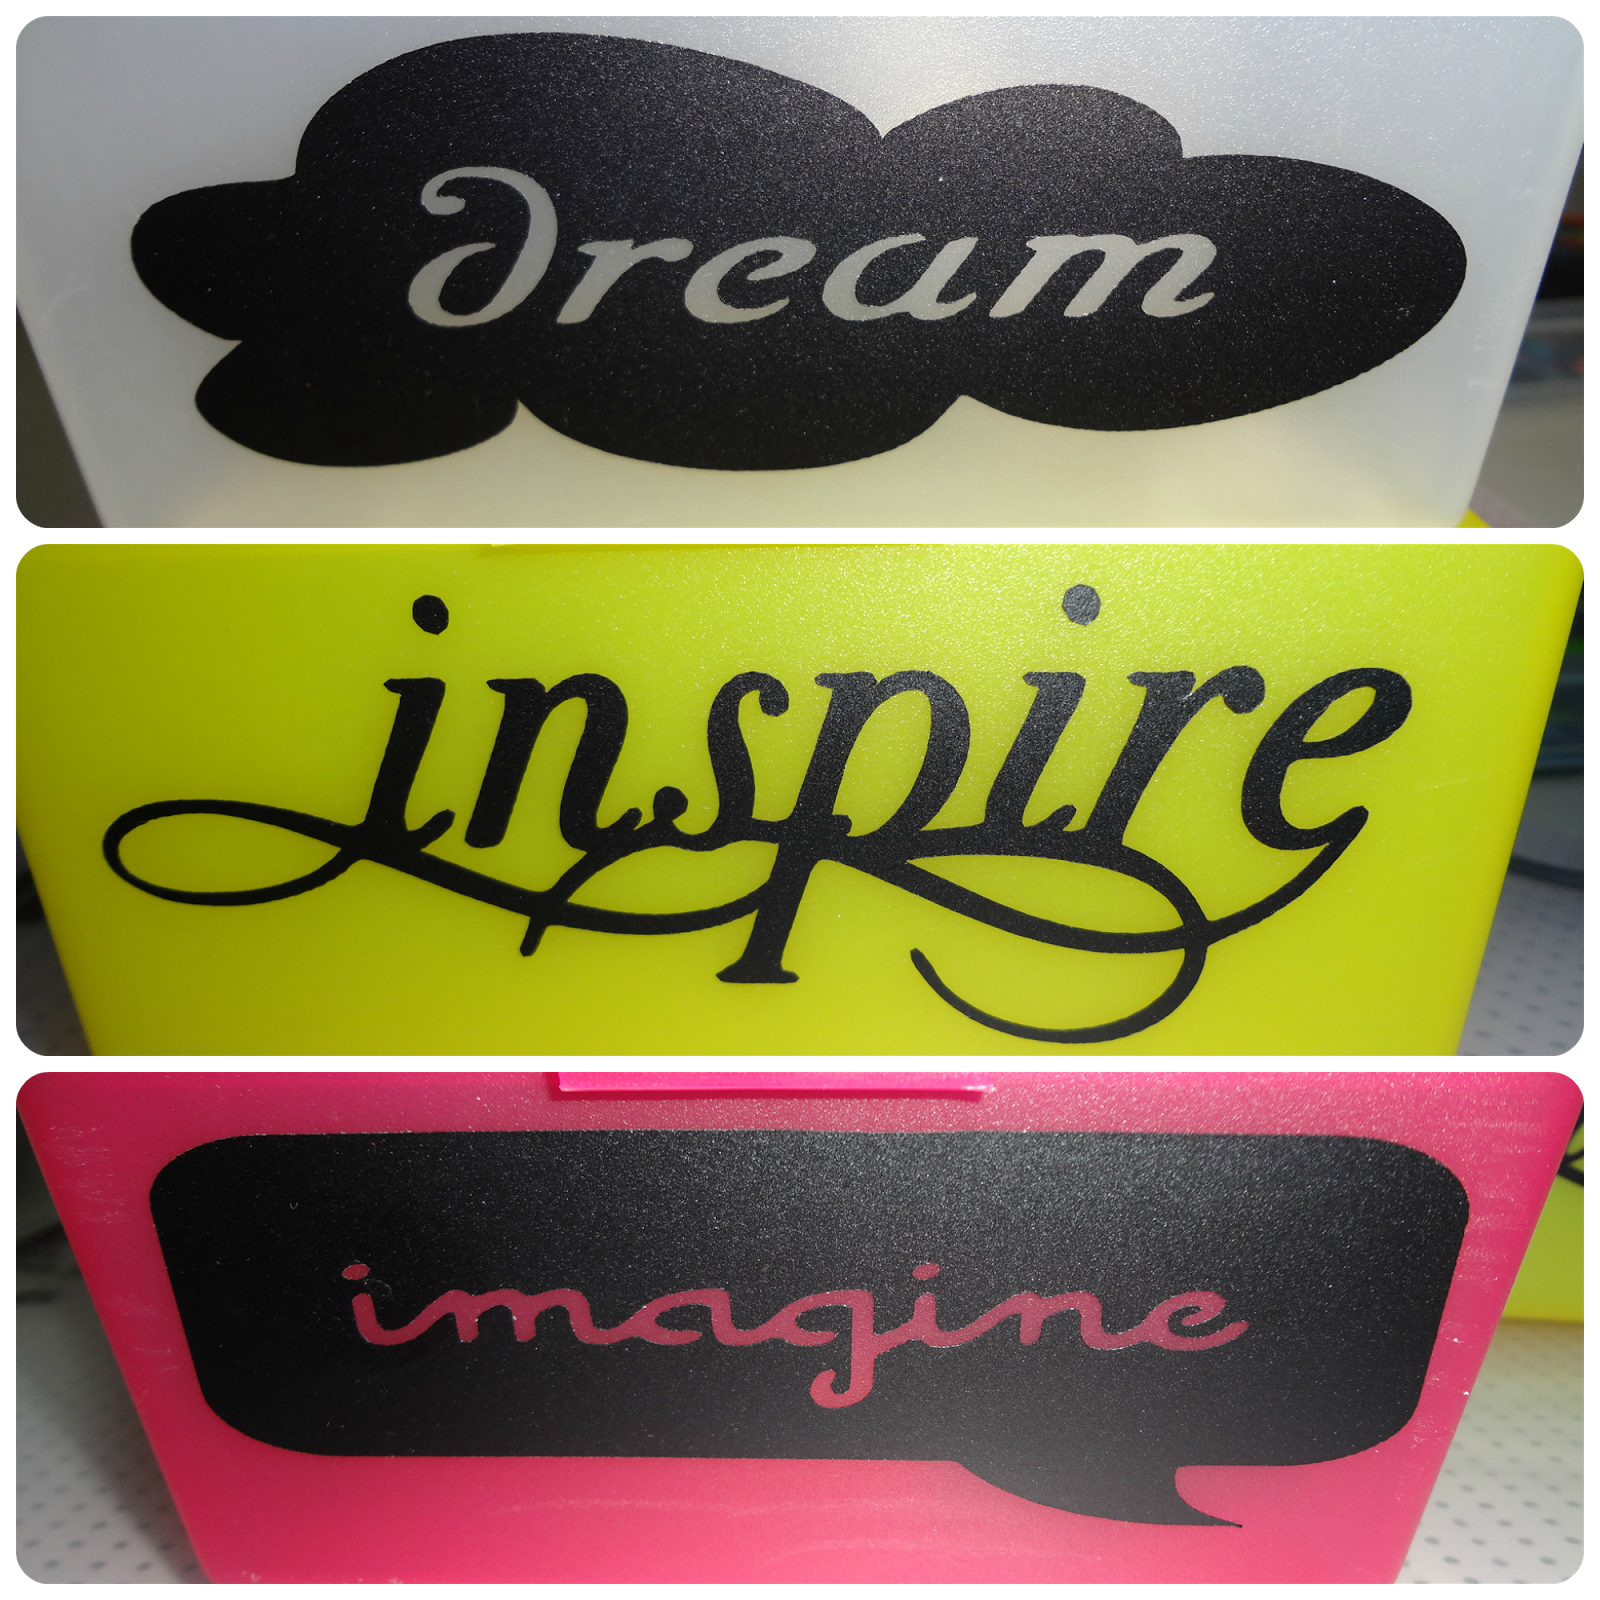
Ikea Project #7 - Stackable Mini Storage Boxes
IKEA Project #7 - Stackable Mini Storage Boxes

These were the cutest little stackable storage containers. They come in a 3 pack in 2 different sets of colors. One is Pink/Yellow/White and Blue/Green/White.
These would be perfect for your kids art supplies.
I am using them in my office so I decided to put inspiring words on the front of each one. (if you were making them for your kids you could put there names on the front of each container.)
Supplies:
- Cutting Machine
- Vinyl (I used black)
- Design Cartridge or design on the web. (I used Cricut's Home Accents)
Happy Friday!!!
Carrie
Tuesday, August 13, 2013
IKEA Project #6: Fruity Funnel's
IKEA Project #6 - Fruity Funnel's

Supplies:
- Cricut
- Home Accents Cartridge
- Black Vinyl


I chose the pear and apple design. I set my cricut at 1 1/2" height and cut 5 of each design. Then like any other vinyl project, applied the fruit neat the rim of the funnels.
This was a fun and easy project.
Carrie
Monday, August 12, 2013
Adding a SPLASH of COLOR to your Kitchen!!

Me and my hubby live in a rental so we are limited on what we can do to decor wise. We cannot paint walls or upgrade things. My boring little kitchen needed a little color and me in it. I love the color orange and I love pigs. So I grabbed my knife wood block and a wood pig plaque my mom gave me.
Both needed a little TLC and pizazz. I decided to paint them a pumpkin orange. I had a small tester bottle of the exact orange that I wanted to use. I purchase this at walmart for a couple dollars. these are kind of nice for smaller jobs and the lid has an attached brush. bonus. If you are interested in the color it is a better homes and garden brand, item # BHG418 Mango Mania. I painted the whole knife block except the bottom and the pig I only painted the top and sides. note: when painting the wood block, to keep the metal plaque on the front from getting painted I covered it with masking tape.
Once the orange paint was dry, I applied 1 coat of clear sealant and let dry for a couple hours.


Now I pulled my cricut and my "make the cut" design system out and cut out 2 "H"s and 3 fun frames to surround the H's for the wood block and then I cut out the saying "Never Trust a Skinny Cook" all using black vinyl. Vinyl has become such a popular and stylish way to add a bit of you to walls and decor. when I got my decals where I wanted them I just used a credit card to rub over the tops of them to help them stay on. and there you have it.


Hope you enjoyed this project!!
Carrrie
Sunday, August 11, 2013
IKEA Project #5 - Circus Themed Mobile
IKEA Project #5 - Circus Mobile

I am super excited about this one.
Below is a picture of what it looked like when I bought it from IKEA. This is a white drying rack found in there laundry section. check it out
HERE

Supplies:
- IKEA drying racks (white, red or black)
- Tissue Paper
- Modge Podge
- Brush
- Wire
- Fabric Strips
- Ribbon
- Scrapbook Paper
- Glue Gun & Glue
- Pony Beads
The first thing I decided to do to this was add some color to the legs, these legs have an indent area on both sides. I picked out some blue tissue paper, grabbed my modge podge and brush and was ready to rock and roll. To apply the tissue paper, I first spread a little modge podge in the indentation and took a torn piece of tissue paper, pressed the tissue paper onto the modge podge and then took more modge podge and brushed it onto of the paper also, then if there was tissue paper on the sides I would just brush them towards the middle and seal them down. I also covered the bottom round base with tissue paper also using the same technique.

Once I had the legs finished, I had to decide what theme I wanted. I came across some fantastic scrapbook paper of circus animals and all things circus in the "All About Boys Stack".

To make the Streamers:
Cut out the different designs from the scrapbook pages, organize them a bit on your table so you have a clear idea of how they should be glued onto each ribbon. Take a 10-12" ribbon and glue one design on one side of the ribbon, then turn over and glue the other design on the backside (these need to be the same size). Continue to work down the ribbon (I put 3 sets of designs on each ribbon). you will need 16 strands of ribbons for this part and 96 designs. Once your finished with a strand you can clip it to the mobile using one of the hanging clips.

To make the Big Top:
Take wire and make 2 circles. The first one measuring 2" across and the second one 15" across. I made the circles by taking my wire making a complete circle then going around the entire circle by wrapping more wire around. These are not solid circles, they are still going to bend (that is ok for this project). Now I grabbed red & white fabric. Each strip will me 9" long, you will cut strips at an angle as shown in the below photo (your strips need to be skinnier at the top and wider at the bottom). You will need 16 strips of white and 16 strips of red. Tie each strip onto the smaller wire circle, alternating colors. Now glue the larger wire circle to the top of the 8 legs. To glue the wider ends of the fabric strips to the larger circle follow this order (white onto the wire above one of the legs, red, white, red on the bare wire in between the leg you just used and the following one, repeat until you complete the circle.) I personally did all my white strips first then my red ones. Once all the strips are glued, cut v's into the ends of the fabric that are dangling over the wire.

To finish it all off. I glued yellow ribbon around the entire base (on top of the fabric) and then added a yellow bow to the top and your finished.


Hope you enjoyed this craft project.
Carrie
Saturday, August 10, 2013
Ikea Project #4 - Desktop Workspace
Project #4 I used a clear desk pad from IKEA

Supplies:
- IKEA clear desk pad (http://www.ikea.com/us/en/catalog/products/66703500/)
- wrapping paper
- scissors
- vinyl
- Cricut, Silhouette or any other cutting machine
- temporary adhesive spray
the first step is to lay your wrapping paper onto your desk top (design face up). Spray the temporary adhesive spray on the back side of the desk pad and then slowly apply the desk pad sticky side down onto the top of your wrapping paper. Now take your scissors and trim off the excess wrapping paper around the edges of the pad.
To decorate the top of my pad I wanted my blog name and a horizontal & vertical ruler. Making projects quicker and easy. (no more looking for a ruler). I designed a 24 inch ruler & 12 inch ruler using inkscape, saving it in a sag file then using my Make the Cut program cut the rulers out of vinyl. Same thing my blog name. (if you want a copy of the ruler design let me know). Once the designs we're cut out. I applied them to the top of my work pad and ta-da. I was very happy with the end results on this one.


Carrie
DIY Locker Chandelier
Here is my audition piece for "So you think you're crafty"
This piece actually ended up above my kitchen sink. I love it.
I have noticed over the last few years that there are more and more ways to individualize your lockers. I would have loved to have had some of the options out there, shag carpet, wallpaper, and so much more. I love, love, love chandeliers and have seen a couple versions but just didn’t like many of them. so when I found out that this project was school related it was time to bring on the glitter and glue and show what I was made of.

First things first I had to go to a couple different stores and look at everything, while I thought, hmmm can this work or maybe this will work. I was originally going to make it out of thick metal but then I came across a pack of forks and bingo, my idea was born. So I started with bending the prongs of the forks in different directions and then glued all 4 forks together, creating not only the frame but also the fun flourishes on the bottom. next i took hooks and glued them on the top and bottom of the base of forks, then ran out to the porch and sprayed the whole thing down with a bronze spray paint. Now I am just getting giddy. Next I found orange and brown beads and strung up 4 long strands to drape from the top of the flourishes.

To finish it all off I had to have a fancy ceiling base. So taking a lid from a italian crumbs container. I hot glued 6 more hooks onto the top of the lid and ran to the porch again to spray paint. I then poked a hole in the middle and using fishing wire strung the chandelier base through the ceiling base. So you are probably wondering how do you attach it to the ceiling of your locker. Easy. I glued 6 round magnets into the ceiling base and ta-dah It clicks right to the top of the locker. fun fun fun

Friday, August 9, 2013
Baby or NO Baby, That is the conundrum!!!
A subject that is very close to home with me, are children. Growing up in an LDS family. Family is a subject that is touched on frequently. We are taught our entire lives about how important growing up and having a family of our own is. We as women are built with an inner hunger for a baby of our own aka. Baby hungry. But what happens when you either struggle with pregnancy or just plain can't have them. No one prepares you for that lose and hole that it creates in your heart. Being a woman and having this problem makes you feel broken and helpless. Yes talking about it helps, filling your lives with other activity's, a wonderful husband and of course chocolate help. But filling that hole is very hard and seems to hit you hard at times. Making even sitting in church hard, seeing all those children and other pregnant women. Then getting on Facebook and reading or seeing your girlfriends post "a we're pregnant, monthly prego photos, ultrasounds, baby showers, baby's birth announcement, baby's blessing day, I could go on and on. Oh course I am happy and delighted for these people, but also feel like Eeyore with a rain cloud following me.
There have been times where I don't feel like I belong because I have never been admitted into that mom club. I face this even as a blogger. There are so many bloggers out there and the percentage of the ones that have kids and have kid related posts are high. There are times when an event comes up or opportunity and because it is kid related I can't participate or feel very reluctant about joining. I know that people aren't being malicious towards me, but they also don't understand my position in the matter. You always get comments such as "don't worry it will happen". We'll gosh dang it they don't know that it will happen. At the same time I can't really tell you how I would want them to respond.
That's life I guess.
Rambling of Carrie
Ikea Project #3 - Quote or Photo Stand

My #3 Project was a .99 cents stand that is good for quotes or photos. It has 4 pieces, the frame, the base and 2 plastic plates (which are covered with a thin plastic cover that once you are using it you peel off the plates. I chose to get this in white so that I could personalize it.

Supplies:
- Ikea Stand set
- Washi tape (color and pattern of your choice)
- exacto knife
- modge podge (I used the glitter type)
- quote printed onto colored paper

To decorate wrap the washi tape around the sides from the inner slot to all the way around to the other side of the slot. Because you need to leave that slot open for the plates and quote to slide in. Use an exacto knife and cut off washi tape using the slot for a guide. Keep doing this step until you get the frame looking like you want it too. Once you have decided you are done. Seal the washi tape onto the frame with modge podge. Let dry.

I chose to go with a princess bride quote. Who doesn't like that movie. there are so many good quotes in that movie. In inkscape I created my quote template. You can do this in word also. I have a printable template below if you like this quote. Print the quote onto colored paper (your choice). Then cut out to match the size of the plastic plates.
Sandwich the printed quote in between the 2 plastic plates and slide into the frame from the top and you are finished. Now sit back and enjoy glancing at this terrific quote.

Printable Quote:
(click on the image and then choose to print)

Happy Friday!!
Carrie
Thursday, August 8, 2013
Plastic Bag Organizer - IKEA Project #2
IKEA find #2 - Plastic Bag Organizer

I came across this little beauty for either $2.99 or $3.99 (can't remember). It is made of white plastic and you can either mount it to the wall with the sticky strips (attached) or use nails/screws and hang it with the holes in the back. how many times do you have an abundance of plastic bags from grocery shopping and they just get tossed to the side or end up all over the place. I have had that problem, but no longer. Not now that I have this baby.
Now that we have address it's function.
Let's move onto making it pretty.
I have been using my washi tape on everything lately. So why should this be any different. I found 3 washi tapes that I liked the colors, patterns and they worked together. Taping horizontally up the container I created lines that not only looked great but we're super simple to apply. After finishing the tape design, I sealed it with glitter modge podge. This way it was more durable and would last so much longer. After the modge podge dries it is ready to attach to the wall and start filling.

Another Happy Ending Craft!!
Carrie
Daisy Corkboard's - IKEA Project
I recently attended a blog mixer to celebrate IKEA's new catalog.
After enjoying a nice breakfast and chatting with my fellow bloggers, we all had a chance to check out some of there great products. They also had a educational class on there comfy mattress sets, where we were taught the difference of how each material works and which material is best for your body. Then we of course all took a nap (JK) and tested the mattress's out ourselves.
IKEA is a fun store to not only check out there display rooms (office, bedrooms, kitchens) upstairs ,where you get a ton of inspiration, then downstairs you have more of a store/warehouse set up. I found items for future projects left and right.
Check out there catalog: Here you can either download it to your computer, ipad or phone.
One of my great finds was a 3 pack of heat trivets for $2.99. You can find here
these are normally used for putting a hot pot or dish on.
But I had much different plans for these babies.
Because they are made of cork, I instantly thought of making some decorative cord boards for one of my walls.

Ta-Da... see how cute these are. I made the flower background out of recycled cardboard and modge podged decorative scrapbook paper onto the cardboard. Once dry then I applied glue with my glue gun unto the back of the cork round and then applied directly to the middle of the flower.
Now you can tack your important messages or notes onto the cork board.


Happy Crafting!!!
Carrie
Wednesday, August 7, 2013
Project Life - Becky Higgins Kit
When this opportunity came along I was doing a happy dance. Project life by Becky Higgins is a scrapbook line, which can I say it " fantastic products", she just blows me away with all the fun things you can do with these kits.
I was lucky enough to get to play with one of her newest kits:
Vintage Travel Edition
When I received my kit and was able to shuffle through all the fabulous cards I was so giddy with creative mojo. This is a great kit for all you who love to travel or have little boys. The kit includes cards with airplanes, trains, hot air balloons, automobiles, world maps and so much more.


Her kits are built so that you can scrapbook quick and easy,
while still looking fantastic.
You can find other great kits @ http://www.beckyhiggins.com/blog/
The photo below shows that you will need an album, (1) of her kits, Photo pocket pages, your own photos and a pen to complete a page.

Below I created a 2 page layout using only the above required products.
I grabbed my album, chose which photo pocket pages I was going to use, found the cards that would be perfect with my train photos, arranged all the photos and cards, then last but not least did my journalling and I had a finished 2 page layout.

But I didn't stop there. I decided to do it old school also. To show you how
many ways you can use this kit. I love adding extras. So on this 2 page layout I picked 2 brown 12x12 pages for the background. Then looked for cards in the kit that would match my photos and colors. created a great layout with both. Then added a touch of this and a touch of that with washi tape, metal buttons, puffy words and red glittery thickers.


Not only can you use this kit for scrapbooking but so many other things as well. Here I used some of the cards to decorate an envelope. But the possibilities are endless. Because this is an adventure kit you can take one of the cards, put your personal info on the front, laminate the entire card, punch a hole at the top, add a ribbon and you now have a personalized travel tag to tie onto your luggage. You can also turn one into a To/From tag for a gift bag.

Using this kit was so much fun.
You'll have to keep an eye out for any other projects that come out in the future.
Carrie
*This was a product review where I did receive free products. The opinions are my own.
Monday, August 5, 2013
Season 17 Auditions for "So you think you're crafty"

I am a proud participate in the auditions for Season 17 of
"So you think you're crafty"
Come and check it out. the theme is "back to school" and there are 20 fantastic projects by 20 different bloggers. So much craftiness in one space should be illegal. Now I can't tell you which one is mine but I do want you to take 1 minute to click on the following link: http://www.soyouthinkyourecrafty.com/season-17-auditions/ , check out the projects and click on your top 5 favorites. It's that easy.
Voting will be open until Thursday, August 8, at 5 p.m. MST.
I had so much fun with my project,
I can't wait until you find out which one is mine.
Carrie
Sunday, August 4, 2013
Top 5 Tips for Capturing & Sharing meaningful family Vacation moments

Growing up my family didn't have too many opportunities to take vacations. So now that I am older I really cherish the moments when we do. We try to get at least 1 big vacation each year. Research is the most important thing when wanting to get the most out of your vacation. I know that any time a vacation is getting close on the calendar I go into research mode.
Here are 5 ways to research your destination and find all the fun things to do.
(For all my examples I will use a Disney Vacation as the destination)
- Internet (Locations Main Website): Depending on where we are heading, my 1st stop is the internet (you can find practically everything you want on the internet these days). I am the type of person who wants to experience everything and I don't like to miss out on new experiences because I didn't know about it. So of course I go to disney's main website address (www.disneyland.com) first and read about everything. Including what rides will be down during the time I will be there. It is the worst feeling when you get to this magical land and find out your favorite ride will be down the entire time you are there. Remember also if you are bringing little ones to check out height requirements (most rides all your kids should be able to go on.)
- Internet (reservations & vacation companies): this tip is about researching your options for lodging and vacation packages. I have booked my vacation a number of ways over the years. You can go through disney themselves, they have lots of options for packages that meet many price ranges. Then you have companies such as www.getawaytoday.com that do similar packages but are fantastic to work with and have many add on options for things like a pirate dinner show or tickets to lego land. One great thing about the packages is how easy it is to add on a character breakfast, these are located at different restaurants inside the park where your kids or you can experience having breakfast with some of there favorite disney characters. and you get some great photos too. Or last but not least you can book the hotel, tickets and everything else yourself.
- Disney Blogger Websites: Now a day's you can find tons of disney fans that love disney so much that they have made it a full time gig by blogging about nothing but disney. These people have some great ideas and info that you normally wouldn't find. Here is where you can find out more facts about the rides or buildings or little extras. Here you will find personally experiences and tips about what not to do and some helpful tips like tying a colorful scarf to your stroller so that you can find it easily through the mass of identical strollers or that if you go to a food vendor if asked they will give you a free cup of ice water. You will also see polls on what restaurant has the best hamburger or ideas on keeping your child safe (they have come out with these cool rub on tattoos that have your phone # on them so that if your child gets lost they can call the number and find you). Also there are plenty of posts out there about saving money on these kind of vacations, some of the ideas are fantastic.
- Guest Relations: We always stop at guest relations located at the front of the parks. these people are awesome (they are Disney Concierge) and they can tell you about so many fun things to do while you are in the park. To start out with you can take your child in there and they can call and talk to a disney character on one of there old timey phones. You can grab a button that tells people you are celebrating and event (anniversary, birthday, etc) while you have this button on, the cast members will be extra nice to you when they see your button. Also you can not only pick up maps of the park but you can also get special maps (there is one that tells you where every penny press machine is in the park). they can also set up special things such as tours, princess makeover, pirate makeover or jedi training. They can tell you about the parades and extra little shows that go on through out the day and give you times and tips on how to make the most of them.
- Cast Members: I talk to these people a lot and see if there are things they may know about that are not widely known. We scored with this one a couple years ago. By asking a cast member this question they then told us that if you talked to the captain of the mark twain there was an opportunity to ride the boat in the captains box. So we asked and we're then invited up to the top room, where we were not only allowed to blow the horn, but steer. at the end of our voyage we we're able to sign the captain's book and we're given official license's to drive the mark twain. Disney has tons of ways to get around. Make sure you try a ride on the double decker bus, horse drawn carriage, old automobile and don't forget the train, it is fantastic to use to get around the park with a little less walking. Cast members are always willing to take photos so don't forget those photo ops. We all want to remember the fun for years to come.
Those are my 5 top tips. I hope you all enjoyed and learned some new things.
Carrie
Thursday, August 1, 2013
Bathroom Wall Art - Epic WIN

I am doing the happy dance.
uh huh, oh yeah
After my epic fail a couple days ago, I was determined to make this work.
If you want to check out the epic fail click here
So I figured while I was redoing it, I might as well make a few adjustments that will help this artwork last longer. My first attempt I used Card Stock, this time I grabbed 2 slats from a venetian blind and cut them up. Because after I put up the first set I thought to myself " hmmm card stock and moisture, not sure if that's a good idea". So after thinking about it for a while I thought of these slats that i had. and thought "hmm there plastic, plastic & moisture, purrrrfect".
The only reason I have these extra slats is because they broke off the blind and they were replaced by new ones.
supplies I used for this project:
- 2 off white venetian blind slat's
- scissors
- hot glue gun & glue
- washi tape
- chipboard or recycled cereal boxes
- 3 different colored scrapbook paper 12x12
- glitter modge podge
- tacks


Let me know how you like my win on this project
Happy Dance!!
Carrie
Linky Parties
Subscribe to:
Posts (Atom)