Thursday, May 30, 2013

Patriotic Banner


This was such a fun banner to make. 
plus it can be used for 3 holidays: memorial day, labor day and 4th of july.
This banner has a shield, 2 rosette's, 2 star's, american flag and hat.
the following photos shows you what each of them ended up looking like.

The materials I used to make these were recycled cardboard, scrapbook paper, ribbon, markers, sticky gems, glue, Bravisimo rosette's, glue gun, yarn, fabric and lots of creativity.


First thing you need to do is print off the pattern below.
There is a pattern for each design except for the rosette's.

Downloadable Pattern

To make this banner. print out the pattern above, cut all the pieces out, trace onto cardboard or any thick material you want to use.
Then pick out what scrapbook pages you want to use and start covering your pieces.


To cover your pieces place your scrapbook page over the area you want it,
then flip the piece over and carefully cut the excess paper off. it's that easy.
Now start layering and gluing your pieces on. add bling, distress the edges,
 outline designs, use pop up dots to add more depth, this is when you can
 add your own personal stamp to the pieces. make it yours.
once all of your pieces are covered and complete. glue it to a long strip of ribbon.
Tie more ribbon, yard, fabric onto the banner and your finished.

Here are photo examples for each...


Step 1: Apply red paper to the bottom 2/3 of the shield
Step 2: Apply blue paper to the top 1/3 of the shield
Step 3: add strips of white ribbon, start at the top of the red paper
 and run downwards and wrap and glue on the backside.
Step 4: Apply white paper onto banner cutout and then apply banner to shield.\
Step 5: Cover USA letter with star paper and then apply to the banner.
Step 6: Apply red pearls to the blue paper.. if you wish add more bling or swirls.


Step 1: Buy or make Rosette: This one is from bravissimo
 (you can get very cheap through ohmycrafts.com)
Step 2: Draw or cut out the letters for BRAVE, Color and apply to Rosette.


Step 1: Apply blue paper to the star cutout
Step 2: White paper (cut this star a little smaller than the blue one) apply on top of blue one.
Step 3: Red Paper (cut a little smaller than the white star) apply on top of white one.
Step 4: Outline the white star with a red marker.
Step 5: Outline red star with a black marker.
Step 6: Add gems


Step 1: Apply red paper to flag cutout.
Step 2: add white stripes onto red paper.
Step 3: mount blue paper onto cutout and then apply to red & white stripes.
Step 4: Add Gems


Step 1: buy or make rosette.
Step 2: Draw or Cut out letters for HOPE ( I applied gallery glass onto of the letters)


Step 1: Apply red paper to the bottom 1/2 of the hat.
Step 2:  Apply blue paper to the top 1/2 of the hat.
Step 3: Apply red ribbon, start at the bottom of the blue area and
 go upward and wrap around the top of hat and glue on back.
Step 4: Apply white paper to band cutout and then mount onto the hat.
Step 5: Cover all 5 Star cutouts with different paper and then mount onto
 the band in a fun fashion.
Step 6: Add gems & swirls.


To make into a banner, punch a hole into both sides of each shape. run ribbon through holes and make a knot. Then to add a little something more to the banner. apply yarn, fabric strips and ribbon.


Happy Crafting!!!

Carrie

Linky Parties

Round Up                         Catch A Glimpse Party                Hooking Up w/HOH
Blog Stalking Thursday      Chic & Crafty Party                 the Weekly Creative LP
Transformation Tuesday            I'm Lovin It                       Make Bake Create Party
Swing into Spring               Show Off Your Stuff                  Lil Luna Link Party
Wow Us Wed                    Whatever Goes Weds                 What I Whipped Up
Best DIY Projects           Country Homemaker Hop             Friday Flair Features
Time Travel Thursday
Yellow Bliss Road

Saturday, May 25, 2013

How to properly DUNK an Oreo!


Shauna taught me this trick a while ago and it's a fantastic trick.
 All you need is a glass of milk, a fork and your oreo's.


Take your fork, insert it into the creme part of the oreo, then dunk.
Isn't that the coolest trick. 
No wet fingers afterwards.
you can dunk half of it at a time or the whole thing.


Happy dunking!!

Carrie

Monday, May 20, 2013

Best Clam Chowder on the Oregon Coast


Mo's Resturant

vs.

Chowder Bowl at Nye Beach


We tried out two different resturant's on the oregon coast.
Both places are known for there clam chowder.
So we had to try the clam chowder from both to see which one should win the best clam chowder award from CraftyNightOwls.
And while we were there we also tried there fish and chips.


Mo's Resturant
www.moschowder.com

Locations:
622 SW Bay Blvd
Newport, OR
541-265-2979

122 1st Street
Otter Rock, OR
541-765-2442

860 SW 51st Street
Lincoln City, OR
541-996-2535

195 Warren Way
Tolovana Park, OR
503-436-1111

1436 Bay Street
Florence, OR
541-997-2185

Bowl of Clam Chowder - $4.50... New England Style made with bacon.
Fish and Chips - Cod $11.95 or Halibut $14.95 ...  Panko crusted Cod or Mo Ale beer battered Halibut and french fries. Served with your choice of clam chowder, dinner salad with shrimp, cabbage salad, with shrimp, coleslaw with shrimp and home baked bread.


Chowder Bowl at Nye Beach
www.newportchowderbowl.com

Location:
728 NW Beach Drive
Newport, OR 97365
877-433-9881

Bowl of Clam Chowder - $5.95 ... creamy clam chowder with tiny pacific shrimp.
Fish and Chips - $12.95 ...We use only choice Pacific true Cod. lightly breaded and deep-fried. Served with golden fries, red sauce tartar and garlic bread.


So now that you know all about these 2 resturant's I bet you are wondering which one is the best.

The Clam Chowder Winner is ... Chowder Bowl at Nye Beach

Their clam chowder was creamy and delicious.
what I didn't like about mo's is that is was gritty and a bit course. I felt like there was sand in it.

Chowder Bowl at Nye Beach also had the better fish and chips. our dinner there was awesome. the food was fantastic, atmosphere friendly and it was a nice close walk to the beach. 

Hope you all check this place out.

Carrie

Sunday, May 19, 2013

Disney Princess Postcard

Disney Princess Postcard


One of my nieces recently had a birthday and she like most little girls love the disney princesses. So a month before her birthday I wrote Cinderella a letter asking for her to send a signed photo and she sent me a postcard with 8 of the princesses and tinker bell all signed. It was address to my niece. She loved it.
So how this worked was send a letter to disney at:

Walt Disney World Communications
P.O. Box 10040
Lake Buena Vista, FL 32830-0040

Or, if you'd prefer, you can receive a black and white photo if you write to your chosen character at this address:

Walt Disney Company
Attn: Fan Mail Department
500 South Buena Vista Street
Burbank, CA 91521

Happy Disney Day!!!

Carrie

Saturday, May 18, 2013

Hey Honey, I'm Home!!!

I have been missing in action for the last 10 days. 
We'll not really missing but more like melting into nature.
2200 Miles and 8 days and I am finally back home.
One of my passions is taking nature photography.
We'll one of my favorite places to do this is in the state of Oregon.
Everywhere you turn you find beauty.
and a variety of it: waterfalls, lakes, rivers, forests full of lush trees,
 ocean, beach and on and on I could go.
So this next week you can look forward to many exciting posts on my trip.


Here are a few treasures to wet your tastebuds

This is a shot from one of the waterfalls from the Silver Falls State Park.

This one is a shot of clear lake.

Happy sightseeing through the eyes of Me!!!


Wednesday, May 8, 2013

Patriotic Wreath


I am in love with my new front door wreath.
It just screams patriotic joy. 
what's great about this wreath is that it can work for may and july.


Supplies to make this wreath

paper
scissors
black marker
glue gun
cardboard
tissue paper
love
Here's how I made it:

Start by cutting out a 7 1/2" circle from chipboard or cardboard
 (this was the back of cereal box)
Make 3 more circles for guidelines: 5", 3" and 1 1/2" circles. 
This is were you are going to place the scrolls.


To make the scrolls you will need 5 1/2" x 8 1/2" sheets of paper
If you want the black edges on the front you place the marks on the left and top.
On the back it will be all the way across the top and 1/2 way down the right side.


Now how to curl it. front facing down, grab the top left corner and start to roll diagonally towards right bottom side of paper. Once your scroll is complete secure it with a dab of hot glue. 


Getting your scrolls ready for the wreath. flatten the bottom end of scroll. Cut off about 2-2 1/2" off the bottom of your scroll. This will make it easier to add onto the wreath.


Start adding your scrolls. the cut off end of your scroll will line up with the pink 5" circle. 
while adding more work in one direction and overlap a little.


Your second layer is the green 3" circle and the 3rd layer is the orange 1 1/2" circle.
(don't let my 2nd layer photo confuse you, the one on the left. In that picture the red is the 1st layer and the white is the 2nd layer, it's from my first wreath)


When you get all 3 layers put on the middle hole is going to be a bit deep. To fix this I took small pieces cardboard and stacked them until it filled the hole. 


Now for the center. I cut out a 3" circle and covered it with red tissue paper. then applied it to the stacked cardboard pieces.


Your probably wondering, so how do I make the fantastic flowers to add to the front. 
You can find tutorials Here and Here


Happy Patriotic JOY!!!


Linky Parties


 Whatever You Want Wednesday              It's Party Time!
Lil Luna Link Party                               Wow Us Wednesday
Whatever Goes Wednesday              What I Whipped up Weds
make Bake Create Party                         Swing Into Spring
Round Up

Tuesday, May 7, 2013

Paper Flower Tutorial


I am a flower snob sometimes and a lot of the flowers out there don't fit my liking. 
Until I came across these flowers on Pinterest. All the pins I came across were for etsy shops or just photos. So I made some myself and am passing on the tutorial.


From Top L
1. cut 5 squares of paper (mine were 6")
2. fold in half like a triangle
3. fold both sides up
4. open folds and flatten sides down
5. tuck the tops of the sides inward and crease
6. Fold in sides so you have to flaps on each side.
7. glue outer flaps together.
8. Assemble Petals & glue
9. Your Finished
now you can add gems or buttons or any fun things on top.

Happy folding!!!


Linky Parties


Tutorials & Tips                      Handmade Tuesday
Show Me What Ya Got       Take A Look Tuesday
Create & Share                       Get Your Craft On
Metamorphasis Monday           Monday Funday
Craft-O-Maniac Monday    Whatever You Want Wednesday
It's Party Time!                       Lil Luna Link Party
Wow Us Wednesday        Whatever Goes Wednesday
What I Whipped up Weds           Round Up

Saturday, May 4, 2013

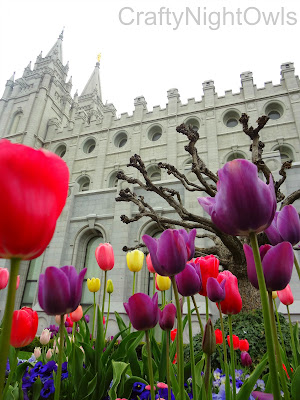
A Stroll Thru the Tulips


I have been dying to capture more of the spring loveliness that is all around us here in the salt lake valley. Me and my honey went downtown to the walk around Temple Square. The Temple is always gorgeous but today it was surrounded by thousands of tulips and blooming trees. So I had fun with my photo shoot and brought home lots of winners. Here are a few for you to enjoy.


Not sure what kinds of flowers these are. If any of you know please let me know. 


Happy Snapping!!


Linky Parties

Friday, May 3, 2013

My first ever FEATURED Post!

The great people at Clean Jewelry featured my duct tape beads today on there site. I was so excited when they asked to feature me. I have been working like crazy these past 8 months trying to put out great posts that people will love and this was my first ever recognition.


To check out this fantastic feature


Thank you so much Clean jewelry for taking the time to come and
 visit my blog and to feature my little duct tape gems. 

Happy Crafting


Thursday, May 2, 2013

Missing Sock Station


I have been wanting to create this wall decor in my laundry room for quite some time. Not only does it look cool but with me living in an apt it is something that can be removed easily. How many of you guys have missing socks when you are doing the laundry. I know I do and I am always miffed at were to keep them until I can find the match. So I decided to make a wall dedicated to my lost sock syndrome.

To create this decor you will need the design done in vinyl 
(whether you do it yourself or buy it from someone else), twine, popsicle stick, 
clothespins and 2 nails or push pins.


After you clean your wall. start arranging your words on the wall. take the strip of paper off the back of your word (the piece of paper that has the grid). while you are arranging your design, remember that you can reposition things (the contact paper allows you to stick and unstick the design until you rub it on.


If you are to the point that you are happy with your design. Take your popsicle, credit card or anything flat that you can use to rub. rub over the design and then slowly start peeling the contact paper off, leaving the design on the wall. If while you are peeling the contact paper the design comes up, press back down, rub again and try to peel off again.

After I finished applying my vinyl design. I took a long strand of twine and using to pushpins, tacked to the wall leaving a bit of slack in the twine.  Add clothes pins and missing socks. and you are now done.

Happy Crafting!!


Linky Parties


Transformation Thursday                 Hooking Up w/HOH
Catch a Glimpse Inside                    Blog Stalking thursday
Chic & Crafty Party                       Whatever Goes Wednesday
Best DIY Projects                           Simple Create Link Party
Show & Tell Friday                                Frugal Friday
the Weekly Creative LP                           I'm Lovin It
Make Bake Create Party                      Shine on Fridays
Friday Flash Blog                                   Be Inspired
Strut Your Stuff                               Show & Tell Saturday
Spotlight Saturday                           Share Your Creativity
Weekend Bloggy Reading              Sunday Show Off LP
Think Pink Sunday                              It's Party Time
Mop It Up Monday                    More the Merrier Monday

Wednesday, May 1, 2013

Caramel Nutty Chocolate Tart


Try a new and fun mini dessert.
Here is my tart creation.
A crusty pastry cup filled with a chocolate, peanut butter, carmel filling topped
 with whipped cream and a cookie dough bite.
Printable recipe is at the bottom of the post.


start off with sifting your flour, add the butter and cream cheese and mix until doughy.


Once you have your dough, roll it into 24 small balls and 
press into your mini muffin pan.


Filling: melt all chocolate and whipping cream in microwave
add to egg yolk, sugar and whipped cream bowl


Bake and let cool. then decorate


Printable Recipe Cards


Happy Baking!!


Linky Parties


Market Yourself Monday                  Strut Your Stuff
Made By You Monday              Metamorphasis Monday
Pink Hippo Party                       Make it Pretty Monday
Handmade Tuesday                       Get Your Craft On       
Tutorials & Tips                         Show Me What Ya Got
It's Party Time!                  What I Whipped up Wednesday
Lil Luna Link Party                       Wow us Wednesday
Hooking Up w/HOH                  Catch a Glimpse Inside
Blog Stalking thursday                  Chic & Crafty Party
Whatever Goes Wednesday             Best DIY Projects
Simple Create Link Party               Show & Tell Friday
Frugal Friday                              the Weekly Creative LP
Sunday Show Off LP