Sunday, December 22, 2013

Christmas Series Day 30 - Peanut Butter Popcorn Tree


On the 30th Day of Christmas
Santa brought to me

A great idea to add to your goodie plates!
So I am sharing it with all of you
Today I am personally posting :)


My gift to You is a post on
 "Peanut Butter Popcorn Tree"


Here I am posting the last post for my Terrific Christmas Series. 
We had a lot of great bloggers share some wonderful christmas ideas. 

For the last post of the series I am sharing with you a post of a family tradition. Growing up when we would put goodie plates together for family and friends we would love to make peanut butter popcorn and shape them into trees.  Then once they were shaped we would decorate them with gumdrops. 

This year I wanted to add a little bit more to my trees, so I added licorice ropes and a peppermint pat tie cut into the shape of a star and placed on top.


To make a batch of peanut butter popcorn. 
Get your popcorn popper out and pop 3 quarts of plain unsalted, unbuttered popcorn.
Add a up of chopped up walnuts to the dry popcorn in a large bowl.

Before making the peanut butter mixture clean off a counter or table and lay down waxed paper.

Now on the stove in a pot, turn your stove onto medium high heat. Add  1 cup sugar and 1 cup of karl syrup. Stir the 2 ingredients until the sugar dissolves and it is bubbling (make sure you continually stir through this process so it doesn't burn). Once it is bubbling, take off the stove and add 1 cup of crunchy peanut butter to the mix, continuing to stir. Last ingredient is 2 1/2 tsp of vanilla adding it to the mix. 

Now pour mixture on top of the popcorn in the large bowl and stir until peanut butter mixture covers all the popcorn. 

Dump out onto waxed paper, separate and let cool slightly.

Before popcorn has completely cooled shape into trees, balls or whatever shape you would like. 


Love Bakes Good Cakes

Saturday, December 21, 2013

Christmas Series Day 29th - Bead Wreaths


On the 29th Day of Christmas
Santa brought to me

A great idea for an ornament!
So I am sharing it with all of you
Today I am personally posting :)


My gift to You is a post on
 "Bead Wreath's for your Tree" 
I wanted to add more color to my tree. but I had a hard time finding oranges for my tree. If you walk down the christmas aisle in walmart you can find every color BUT orange.
 So I found some nice glass beads and pearls These are very easy to make. String the beads & pearls onto clear fishing wire and tie off. Add a ribbon where you tied off (to cover the knot) and add more to it. 

Supplies: Beads, fish line (or wire) & Ribbon
These cost me .75 each if not less.


Friday, December 20, 2013

Christmas Series Day 28th - Kids Santa or Shepard Beard - with Free Tutorial


On the 28th Day of Christmas
Santa brought to me

Shauna as a "City 2 Country"

Her gift for us is a post on a
"Kids Santa Beard or shepard beard
 free pattern & tutorial"


My mom has an amazing gal in her church that creates fantastic crafts with felt like felt food, kids play activities and such. Yesterday I got an email telling me she had a free pattern for a kids Santa beard. I thought ...Awesome, I have been meaning to make some beards for my kids to wear when they sneak items on porches during our family Secret Santa. As I got materials together I realized I had different colors to make beards for shepard/wisemen costumes as well. I have 4 kids and decided to make one of each color: White, Black, Brown and Blonde. The white one is all white, but all the other ones have 2 colors to give it more contrast. They turned out SOOOOO good and the pattern was simple. The kids can wear these beards at our church Christmas party since they need to dress up as shepards!

Here is her blog with the FREE pattern

Check out her shop BuggaBugs out on Etsy.
She is having a Buy 3 patterns get 1 Free sale on Black Friday


Wednesday, December 18, 2013

Christmas Series Day 27 - Monogram Christmas Ornament


On the 27th Day of Christmas
Santa brought to me

A great idea for personalizing your tree!
So I am sharing it with all of you
Today I am personally posting :)


My gift to You is a post on
 "Monogram Christmas Ornament"


Monogram Christmas Ornament
I am so excited to finally be able to use some of my Tim Holtz Grunge Packs. These packs hold either a page with each letter of the alphabet or each number 0-9 and some fun shapes. They also come with different textures embedded into the top of them. The ones I am playing with today are just smooth. The fun thing about his grunge product is that it is as thick but can be twisted, scruntched and still keep it's form. 


So today I am making a Monogram Christmas Ornament for my tree. 
I Chose and H for my last name. I thought the top right H would be the coolest to work with.

Now that I picked my Letter I grabbed some of my Luminarte in Red. You can use regular paint or whatever you have on hand. 
I think dabbed red on the top of the H, let it dry and then covered the back. Make sure you also get the sides. 
I decided that I would like to put a little embellishment on my H and chose Holly & Berries. So I took a piece of the scrap grunge and outlined 2 leaves and a couple berries with black marker. (if you are nervous about the black marker, start out with pencil until you end up with a design you like, then outline it with black marker.
This is what they looked like once they were cut out. I did 2 berries together and 1 by itself. I did this because I want to layer my berries for an awesome 3-D look.
Taking some green shimmer metallic green paint. Again you can use whatever paint you like.
and I also grabbed some coppery/gold beads from Martha Stewart.
I painted the berries cranberry red, leaves green then added some clear glue to the top of the berries and added the gold beads.
After layering the leaves and berries onto the H.
Add some ribbon so you can hang it and there you go.. you have a personalized monogram ornament.


Tuesday, December 17, 2013

Christmas Series Day 26 - Christmas Nativity Ornament Tutorial


On the 26th Day of Christmas
Santa brought to me

Shauna as a "City 2 Country"

Her gift for us is a post on a
" Christmas Nativity Ornament Tutorial"


http://craftynightowls.blogspot.com/2012/12/sweet-christmas-nativity-ornament.html


Monday, December 16, 2013

Christmas Series Day 25 - Reindeer Handprint Art


On the 25th Day of Christmas
Santa brought to me

Ariean as a "One Krieger Chick"

Her gift for us is a post on a
"Reindeer handprint art"


Sunday, December 15, 2013

Christmas Series Day 24 - Peppermint Thumbprint Cookies


On the 24th Day of Christmas
Santa brought to me

Amber with "Dessert Now Dinner Later"

Her gift for us is a post on a
"Peppermint thumbprint cookies"


Saturday, December 14, 2013

Christmas Series Day 23 - Yummy Bacon Bites


On the 23rd Day of Christmas
Santa brought to me

Ashley as a "Apples by Ashley"

Her gift for us is a post on a
"Yummy bacon bites"


Friday, December 13, 2013

Christmas Series Day 22 - Photo Block Christmas Ornament


On the 22nd Day of Christmas
Santa brought to me

Angee with "Dresses & Messes"

Her gift for us is a post on a
"Photo Block Christmas Ornament"


Check out Angee's Blog Here


Thursday, December 12, 2013

Christmas Series Day 21 - Christmas Gift Tins


On the 21st Day of Christmas
Santa brought to me

Kristine as a "Guest Writer"

Her gift for us is a post on a
"Christmas gift tins"

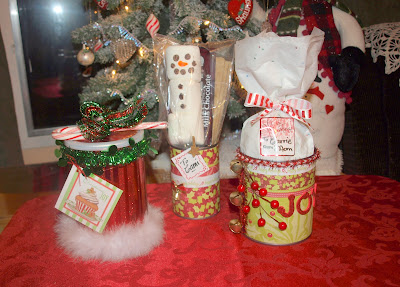
Christmas Gift Tins

There's a lot to say for "presentation". 
  The way something looks is what makes us want to take a closer look. I have always enjoyed wrapping presents and the creative side of me has always loved to take a little extra care in making packages beautiful.  It may take a little more time to do the extra details but it's always a joy to see the finished product and then see the recipient's face light up when you give her the gift.

This year I decided to have some fun making some gift containers for some of my Christmas gifts. I saved some empty food cans,  made sure there were no jagged edges] and then soaked them for a bit in some soapy water to get the labels off.  Once dry, I was ready to start decorating the cans.


I used a "Doritos" can, green beans can and a large tomato can.  [I did not need to soak the "Doritos can.  I put the wrapping paper directly onto the can as is]

I then gather what craft items I need to decorate the cans. [wrapping paper, scrapbook papers, Christmas embellishments, ribbon and cards/tags. etc/]


I used double sided scotch tape and hot glue as my adhesives.  I adhered the papers on first with the double sided tape and then the embellishments with the hot glue. 


I used wrapping paper on the red container at the left and scrapbook papers to the other two. You can use these containers for any kind of gift. [food items or other things : socks, jewelry, etc]
And, you can decorate them for any occasion.


The picture below shows how I turned the "joy" can upside down to be used as a candle holder.  You could make a can for this specific purpose or enclose instructions with the gift can that once the gift is removed, the container could be used for this. You might include the candle inside as the gift.


So, give this fun idea a try. 
 Save some cans and let your creative juices flow.
Happy Creating!