Tuesday, December 25, 2012

Chocolate Wafer Recipe


So I went to the store the other day searching high and low for some chocolate wafers to no avail. I guess nabisco is the only one that makes them and there hard to find. So I ran to the world wide web and found a HOMEMADE recipe for them from smittenkitchen.com
I was so excited about this. smittenkitchen uses hers for making icebox cupcakes. But I was on the road to making a delicious Vanilla bean cheesecake with chocolate crust and salted caramel topping. ( I will share the cheesecake later). AND another plus is there so much cheaper than store bought too. You would need 3 boxes of the Nabisco Chocolate Wafers which cost $4.00 a piece. Yes a whole whopping $12.00 for just the crust. But this way I had all of the ingredients on hand. they are all basic ingredients you should have in your baking cupboard and the butter & milk in the fridge of coarse. So it will cost maybe $3.00 in ingredients if that. 


Chocolate Wafer Recipe
1 1/2 cups all-purpose flour
3/4 cup unsweetened cocoa powder
1 cup plus 2 Tablespoons sugar
1/4 teaspoon salt
1/4 teaspoon baking powder
14 tablespoons (1 3/4 sticks) unsalted butter, slightly softened
3 tablespoons whole milk (I used 1% and it was fine)
1 teaspoon pure vanilla extract

So here we go. Add all of the dry ingredients into your Kitchenaid.
flour, cocoa powder, sugar, salt and baking powder
Mix til blended well. maybe a minute.

Now cut your butter into several pieces and one by one with the kitchenaid mixing add the butter. Once all the butter is in an mixed in well mix the milk and vanilla together first and then add to your mixer. Mix for a minute or two and it will look like this.
Dump your mix onto your clean counter and hand knead for a couple minutes. Then shape into a 14 inch log, wrap in plastic and place in your fridge for 1 hour. until it is firmer.
Place your log onto your counter once again and using a sharp knife, carefully and slowly make 1/4 to 1/8 inch slices. 

Place onto a well greased cookie sheet and place in the oven.
Oven should be set at 350 degrees. 
Place your top rack on the 2nd to top insert and the 2nd rack on the 2nd from the bottom.
Put your cookie sheets in and time it for 6 minutes.
Now rotate your cookie sheets and turn them at the same time. 
leave in for another 6 minutes. 
Take them out and either cool them on the sheets or a cooling rack.
Once cooled and they stiffen up a bit they are now ready for your crust recipe.
Or to just snack on :)

Happy Baking!


Sunday, December 23, 2012

Wrapping & Decorating a present with ONLY wrapping paper.


We all end up with left over strips of wrapping paper when wrapping our gifts. So instead of throwing them out reuse them and turn them into some fun curls to decorate the top of your gift.


Fold a strip of wrapping paper in half. having the crease at the top is important. 
 Now if you aren't comfortable cutting in straight lines or are a bit of a perfectionist then take your ruler and draw lines down your paper. You can choose how wide the stripes are. 
 Leave at least a 1/4 on an inch at the top the won't be cut. This is the side that has been creased. 
 take your scissors and cut up each line. remember stop at the end of the line. Do not cut all the way through. 
 Open your scissors and place one of the tips of the scissors on the underside of the 1st strand.
you are going to CAREFULLY run your scissors down the back of the strand. this will curl it. Don't pull to hard or the strand will break off. 
 Here is what your curls will look like once you are done with each strand.
 I always fold the creased side in half and then place a piece of tape over the fold.

 Now place on your wrapped gift.
 To make a gift tag with more of your leftover wrapping paper. Cut around one of the designs. I chose to cut around one of the snowflakes. 
 Once I cut the 1 snowflake out I applied glue to the back of it and applied it to the backside of another piece of wrapping paper. 
 then cut around the snowflake again.
 I folded over a square piece of leftover paper and applied my snowflake and took a black marker to it. 

It would have also been very fun to turn one of the snowmen on the paper into a tag. 

Hope you have some fun with this new technique.


Wednesday, December 19, 2012

Mint Cookies


Today I am going to teach you 2 different ways to make these easy mint cookies.


I have been dying to try out my new mold (seen below)
All you need is oreo cookie's and chocolate.


Melt the chocolate in the microwave (do this in 30 second increments so that
 you don't end up burning the chocolate). add a little bit of mint extract.
 Spoon the melted chocolate into the mold. fill about 2/3 of the mold. 


Now... take your cookie and press it into the mold. the bottom
 of the cookie won't have chocolate on it. 
Place in the refrigerator until firm.


Once they are firm they should pop out with no problems. 
 Now for the second way to make mint cookies...
Melt the chocolate again (same way as above) in a bowl or cup.
now add a little bit of mint extract. (not to much because a little goes a long way)
Once melted drop a ritz cracker into the chocolate and full cover. 

 I used my tongs to grab the cracker and tapped on the side of the cup
 to get rid of excess chocolate. Once you think you have enough of the extra
 chocolate off. place on a piece of waxed paper and let dry.
Don't these look yummy. and the green ones have those terrific winter
 designs on top from the molds. The mold I picked up from Michael's for $2.00

Hope you enjoy!!


Tuesday, December 18, 2012

Favorite Family Cheeseball


Many years ago I played around with a couple cheeseball recipes until I came up with this one that has become a family favorite.  Christmas around our house isn't the same without this yummy munchie.
We like it best with "Wheat Thin" crackers, but you can use any kind you like.  One of these cheeseballs, along with a bag of crackers, makes a great holiday food  gift, also.
                           
                                            FAVORITE FAMILY CHEESEBALL

                                            2 oz crumbled blue cheese
                                          * 1 [8 oz.] jar Kaukauna sharp cheese spread
                                             2  [5 oz.] jars Kraft pimiento cheese spread
                                             2-3 [5 oz.] jars Kraft Old English cheese spread
                                             2 [8 oz.] pkg. cream cheese, softened.
                                             6 TBS. dreid parsley leaves, crushed
                                             4 tsp. dried minced onions
                                             1 cup finely chopped walnuts

                                              2 TBS. dried parsley leaves, crushed
                                              1 cup finely chopped walnuts


*If you can't find the "Kaukauna" sharp cheese spread [or an a similar brand container of sharp cheese] , then substitute another kind as we did here. Thie sharp cheese tubs are usually found in the deli or refrigerator cheese section.  For these balls we substituted a "cheese whiz" type brand, but my preference of taste is a sharper cheese]  Also, the small jars of cheese can be very expensive so watch for them to go on sale. Super Walmart sometimes carries these at the lowest prices.
If you're not a big fan of blue cheese, don't be afraid of using it here. People can't even tell it's there, but it certainly adds to the wonderful flavor of this cheeseball.  I always add some crumbles, mix and then taste.  You don't want the blue cheese to over power the other cheeses, but to just compliment the overall flavor.


In a large bowl, blend cheese sperads, cream cheese, the 6 TBS. parsley leaves, onion and 1 cup chopped nuts. [I usually mix this together with my hands] This picture shows the bowl of second cup of chopped nuts mixed with the 2 TBS. crushed parsley leaves to roll the balls in later.


Shape into six round balls. [they may flatten out a bit at this stage] Place these balls on a wax paper lined cookie sheet. Cover loosely with foil and place in the frig for a few hours or overnight.


Remove cheeseballs from the refrigerator and with your hands, shape into a round ball.  Roll the ball around in the nut/parsley mixture. Wrap each ball in a square of plastic wrap and store in frig until ready to serve.
[wrap a second time in foil if they are going to remain in frig for a few days to make them air tight.]
They can be refrigerated for up to a couple weeks and stored in the freezer for up to 6 months.

We hope your family and friends will love this cheeseball as much as our family does


Saturday, December 15, 2012

Christmas Tree Wreaths

I wanted to add more color to my tree. but I had a hard time finding oranges for my tree.
 If you walk down the christmas aisle in walmart you can find every color BUT orange.
 So I found some nice glass beads and pearls 
These are very easy to make.
String the beads & pearls onto clear fishing wire and tie off.
Add a ribbon where you tied off (to cover the knot) and add more to it. 


Thursday, December 13, 2012

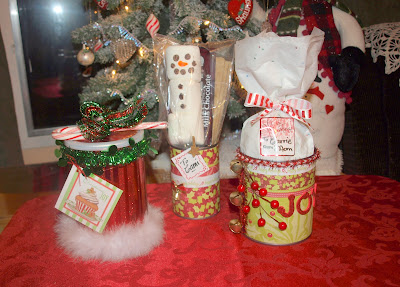
Christmas Gift Tins

There's a lot to say for "presentation".   The way something looks is what makes us want to take a closer look. I have always enjoyed wrapping presents and the creative side of me has always loved to
take a little extra care in making packages beautiful.  It may take a little more time to do the extra details but it's always a joy to see the finished product and then see the recipient's face light up when you give her the gift.

This year I decided to have some fun making some gift containers for some of my Christmas gifts.
I saved some empty food cans,  made sure there were no jagged edges] and then soaked them for a bit in some soapy water to get the labels off.  Once dry, I was ready to start decorating the cans.


I used a "Doritos" can, green beans can and a large tomato can.  [I did not need to soak the "Doritos can.  I put the wrapping paper directly onto the can as is]

I then gather what craft items I need to decorate the cans. [wrapping paper, scrapbook papers, Christmas embellishments, ribbon and cards/tags. etc/]


I used double sided scotch tape and hot glue as my adhesives.  I adhered the papers on first with the double sided tape and then the embellishments with the hot glue. 


I used wrapping paper on the red container at the left and scrapbook papers to the other two.
You can use these containers for any kind of gift. [food items or other things : socks, jewelry, etc]
And, you can decorate them for any occasion.


The picture below shows how I turned the "joy" can upside down to be used as a candle holder.  You could make a can for this specific purpose or enclose instructions with the gift can that once the gift is removed, the container could be used for this. You might include the candle inside as the gift.


So, give this fun idea a try.  Save some cans and let your creative juices flow.
Happy Creating!