Showing posts with label decoration. Show all posts

Sunday, February 2, 2014

14 Days of Love - Day 2... Red, White & Black Chess Decor


My little helper Cupid has been scouring the globe for fantastic lovey dove posts to share with you.

Today Cupid asked me to share a post on "Red, White & Black Chess Decor"
perfect for a valentine's party or to decorate your mantle for the month of February


This is my first ever craft project that I used wash tape on. I have been dying to make these and so I set some time aside yesterday and tackled this project. These are the perfect table or food area display for a valentine's party. Also the color theme usually is black, red and white. 

Supplies needed for this project:
  • wood chess pieces (I purchased mine from oh my crafts)
  • washi tape
  • paint
  • paint brush
  • masking tape
  • exacto knife or scissors (much easier with exacto knife)


I started off by painted the edges black. (see pictures below)
Because I was sloppy I also got black on the front and back of the piece and ended up having to also paint the front and back black. If you are careful during this step you can eliminate the masking tape all together.


This photo shows you why I had to use masking tape. Because the block is black the wash tape isn't as clear and crisp like it should be. the below photo shows how the top part of the piece does not have masking tape underneath and the bottom part does.


With this particular chevron washi tape there are 2 different looks you can get from this just by the way you place the next piece. the top part shows what it would look like if you continued the chevron pattern all the way up. the bottom shows how by moving the design over a little you will end up with a row of diamonds in between the chevron rows. I choose the diamond look.


This next photo shows the steps I took to cover the front and back of the pieces . 
Step 1: (Top Right) Cover entire piece with rows of masking tape.
Step 2: (Left) Apply rows of washi tape making sure you match up the dots, stripes, etc. 
Step 3: (Bottom Right) using your exacto knife, hold the overlapping tape with your left hand                     and slowly a sharp blade and a up and down motion, cut around the edges of the piece.


When I applied the striped washi tape. I decided to do it from top to bottom instead of side to side.
I started applying the tape to the middle first and the moved outward. When laying down the stripes I overlapped the last red stripe onto the first red stripe of the previous row.


These turned out so good, you can always add ribbon around the middle, darken the edges,  or even bling it up more.

Happy Love Month

Carrie

Saturday, December 15, 2012

Christmas Tree Wreaths

I wanted to add more color to my tree. but I had a hard time finding oranges for my tree.
 If you walk down the christmas aisle in walmart you can find every color BUT orange.
 So I found some nice glass beads and pearls 
These are very easy to make.
String the beads & pearls onto clear fishing wire and tie off.
Add a ribbon where you tied off (to cover the knot) and add more to it. 


Thursday, December 13, 2012

Christmas Gift Tins

There's a lot to say for "presentation".   The way something looks is what makes us want to take a closer look. I have always enjoyed wrapping presents and the creative side of me has always loved to
take a little extra care in making packages beautiful.  It may take a little more time to do the extra details but it's always a joy to see the finished product and then see the recipient's face light up when you give her the gift.

This year I decided to have some fun making some gift containers for some of my Christmas gifts.
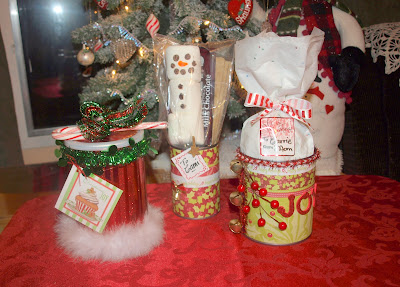
I saved some empty food cans,  made sure there were no jagged edges] and then soaked them for a bit in some soapy water to get the labels off.  Once dry, I was ready to start decorating the cans.


I used a "Doritos" can, green beans can and a large tomato can.  [I did not need to soak the "Doritos can.  I put the wrapping paper directly onto the can as is]

I then gather what craft items I need to decorate the cans. [wrapping paper, scrapbook papers, Christmas embellishments, ribbon and cards/tags. etc/]


I used double sided scotch tape and hot glue as my adhesives.  I adhered the papers on first with the double sided tape and then the embellishments with the hot glue. 


I used wrapping paper on the red container at the left and scrapbook papers to the other two.
You can use these containers for any kind of gift. [food items or other things : socks, jewelry, etc]
And, you can decorate them for any occasion.


The picture below shows how I turned the "joy" can upside down to be used as a candle holder.  You could make a can for this specific purpose or enclose instructions with the gift can that once the gift is removed, the container could be used for this. You might include the candle inside as the gift.


So, give this fun idea a try.  Save some cans and let your creative juices flow.
Happy Creating!  


Tuesday, December 11, 2012

Naughty or Nice Scroll

Santa's Naughty or Nice Scroll

 To Make you need: a roll of kraft paper and a black marker.

 Unwrap the top 8 inches of the the roll of kraft paper and start to tear. 
Keep tearing until you get the desired length you wish to use. 
With a black marker write: Santa's Naughty or Nice List
Then draw 2 sqaures and a name and keep going all the way down the scroll. 
I did family names and then added disney characters and 
movie characters I liked to fill the scroll.


 Start attaching the scroll at the top of your tree and then wrap around the tree.